
 show that the server is currently communicating with port 10000 on another server. The catch is that while the job status said it was working on server A, the netstat showed it was only talking to server B at the time. So I went to server B and restarted the backup Agent and my stalled job suddenly started proceeding again. Of course, this isn't a great long term fix but it's not unusual for backup agents to need a good kick start from time to time. It would be nice if it was better at auto-recovery...
Wednesday, December 9, 2009
backup exec 12.5 stall - e0008821
So every once in a while one of my policy based disk to disk to tape backup jobs will just hang or stall forever. It's really nifty since it will go well beyond the auto-cancellation period - you know the ' stop job if it takes longer than x hours' checkbox. The first few times it happened I wound up having to restart the whole backup server to get the job to cancel since no amount of effort on the front end GUI would fix it. After reboot it would show the failed job with a generic error code of e0008821. I even tried restarting the server that the job status claimed it was working on at the time of the hang. After a few more tries it occurred to me that the job status was lying to me and that it may actually be trying to communicate with the next server on the backup list. So to the command prompt I went. The results of netstat -aon | more
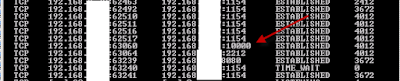 show that the server is currently communicating with port 10000 on another server. The catch is that while the job status said it was working on server A, the netstat showed it was only talking to server B at the time. So I went to server B and restarted the backup Agent and my stalled job suddenly started proceeding again. Of course, this isn't a great long term fix but it's not unusual for backup agents to need a good kick start from time to time. It would be nice if it was better at auto-recovery...
show that the server is currently communicating with port 10000 on another server. The catch is that while the job status said it was working on server A, the netstat showed it was only talking to server B at the time. So I went to server B and restarted the backup Agent and my stalled job suddenly started proceeding again. Of course, this isn't a great long term fix but it's not unusual for backup agents to need a good kick start from time to time. It would be nice if it was better at auto-recovery...
Thursday, December 3, 2009
Step by step creating a Shared Scope in Search Server 2008 and making it show up in the dropdown
So you've got your Search Server 2008 installed and working but you now want to get creative and add scopes to limit results. Seems reasonable enough. If you just try creating a scope from one of your site collections you may find that it doesn't give you any results when you try to use it and you get a nifty error message as well like "scope in your query does not exist".
So instead, you need to create a Shared scope and then make a copy of that scope in your site collection for it to work.
1. First create the shared scope from the Central Admin. Note the mode=ssp at the end!
http://YourServerName:yourportnumber/_layouts/viewscopesssp.aspx?mode=ssp
Click on New Scope, fill in the options and OK out of it.
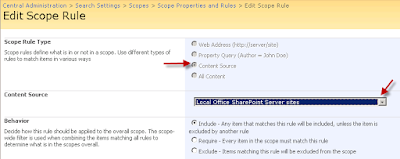
2. You'll now see a that says Empty - Add Rules. Click on that. Here's where you'll set the limit on what sources you want results returned for. In my case, I chose content and limited my scope to only the sites my sharepoint server.
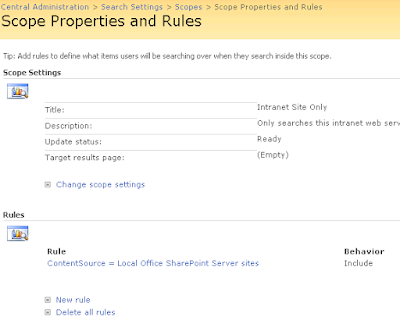
 The finished Shared Scope should look like this:
 3. You may or may not see a message saying that it will update in X minutes. If you see that, wait X minutes before continuing.
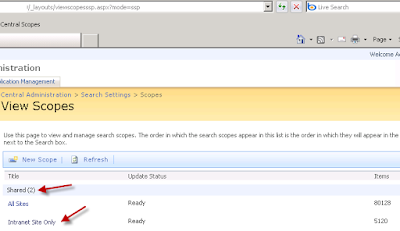
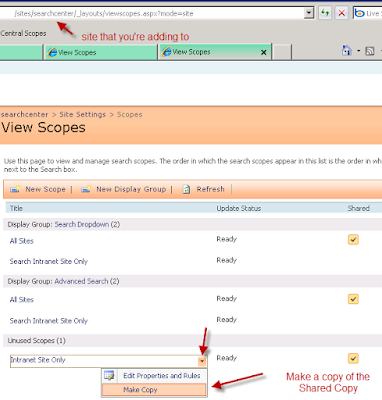
4. Now that you have your Shared Scope, go into one of your sites that you want to add this drop down to. (Yes, this will need to be done for every site that you want to add this to). Click Site Actions, Site Settings and under Site Collection Administration you should see "Search Scopes". If you don't, then log in as someone with more rights. Once you get into it, you should see a screen that by default has "Search Dropdown", "Advanced", and "Unused". At this point you'd love to be able to just drag it over and be done but alas, we're not there yet.
5. Click on the drop down arrow next to your Shared Scope and choose "Make copy"
 6. Then click on the drop down arrow next to your new copy and click on Edit Properties and Rules.
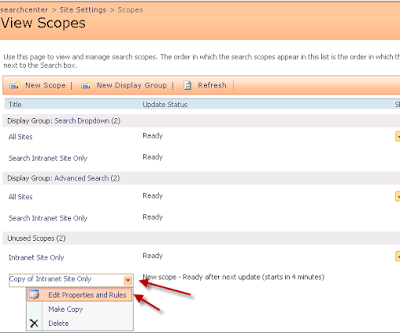
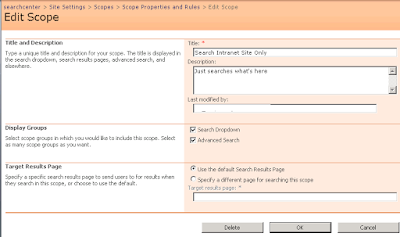
7. You'll notice that unlike the Shared Scope, you can actually check the boxes for "Search Dropdown" and "Advanced Search". Rename the scope to what you want to display, check the boxes, and then click OK.
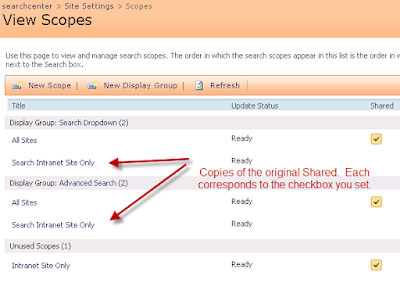
8. Now you should see your new copied scope show up in the right categories. You may or may not see a message saying that it will update in X minutes. If you see that, wait X minutes before continuing.
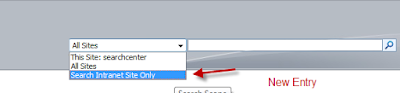
 9. Now if you go into your site and refresh the page, you should see your new drop down option in the search box. (If you've created a "SearchCenter" page, remember to edit the WebPart first to actually show the drop down box.) Test it out to make sure it's working.
 10. Now rinse, lather, and repeat the same for all the sites that you want this scope added to.
Credit where credit's due:
Aboo Bolaky's page - http://www.bolaky.net/?tag=/msse Good clue for finding the mode=ssp starting point.
And a thanks to the countless blogs out there that I used to set up search server 2008 in the first place! (It only took me 5 tries, thank heaven for virtual machines and rollback!)
So instead, you need to create a Shared scope and then make a copy of that scope in your site collection for it to work.
1. First create the shared scope from the Central Admin. Note the mode=ssp at the end!
http://YourServerName:yourportnumber/_layouts/viewscopesssp.aspx?mode=ssp
Click on New Scope, fill in the options and OK out of it.

2. You'll now see a that says Empty - Add Rules. Click on that. Here's where you'll set the limit on what sources you want results returned for. In my case, I chose content and limited my scope to only the sites my sharepoint server.
 The finished Shared Scope should look like this:
 3. You may or may not see a message saying that it will update in X minutes. If you see that, wait X minutes before continuing.
4. Now that you have your Shared Scope, go into one of your sites that you want to add this drop down to. (Yes, this will need to be done for every site that you want to add this to). Click Site Actions, Site Settings and under Site Collection Administration you should see "Search Scopes". If you don't, then log in as someone with more rights. Once you get into it, you should see a screen that by default has "Search Dropdown", "Advanced", and "Unused". At this point you'd love to be able to just drag it over and be done but alas, we're not there yet.
5. Click on the drop down arrow next to your Shared Scope and choose "Make copy"
 6. Then click on the drop down arrow next to your new copy and click on Edit Properties and Rules.
7. You'll notice that unlike the Shared Scope, you can actually check the boxes for "Search Dropdown" and "Advanced Search". Rename the scope to what you want to display, check the boxes, and then click OK.

8. Now you should see your new copied scope show up in the right categories. You may or may not see a message saying that it will update in X minutes. If you see that, wait X minutes before continuing.
 9. Now if you go into your site and refresh the page, you should see your new drop down option in the search box. (If you've created a "SearchCenter" page, remember to edit the WebPart first to actually show the drop down box.) Test it out to make sure it's working.
 10. Now rinse, lather, and repeat the same for all the sites that you want this scope added to.
Credit where credit's due:
Aboo Bolaky's page - http://www.bolaky.net/?tag=/msse Good clue for finding the mode=ssp starting point.
And a thanks to the countless blogs out there that I used to set up search server 2008 in the first place! (It only took me 5 tries, thank heaven for virtual machines and rollback!)
Tuesday, November 24, 2009
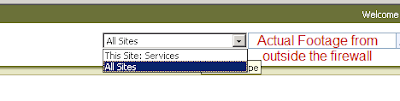
Search Server 2008, ISA 2006, AAM, and why All Sites wasn't showing up externally
So I've had my WSS 3.0 SP2 site running for quite some time now and had all the publishing in place for ISA Server 2006 so my guys could get access to it remotely. I finally decided to try out Search Server 2008 Express which took a few tries to get installed correctly. (Thank heaven for virtual machines and snapshot rollback!). So now all my sites have an extra drop down under Search for "All Sites" and I now have a search center site collection for users to hit directly as well. Problem is, that it wasn't showing up externally and the search center site completely barfed for my external users.
At this point I was pretty sure AAM (Alternate Access Mapping) was involved but I just wasn't sure why Search was so special. It took a couple of hours but I figured it out. There's a ton of good websites out there that show you how to set up sharepoint and ISA server so I'm just going to focus on what I missed and skip the basics.
Mistakes:
1. I had never 'Extended' the Web Application. I only had a Default Zone Web Application.
2. My ISA publishing rule was using the Intranet Zone name for the server. Which means that all external users were being seen by the Sharepoint server as using the Intranet Zone even thought they were using the Internet address. (i.e. They typed in sharepoint.yourdomain.com and the ISA server sent on sharepoint.intranet.yourdomain.com). This was never a problem before search but it became one afterwards.

Warning: I am by no means an expert on Sharepoint, I just play one at work. The following comprises the most critical things I had to change to get mine to work. Always back up your systems before making changes to production environments.
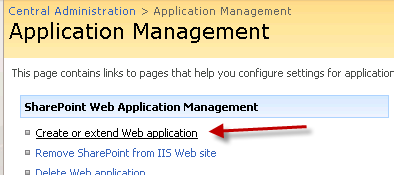
So to fix it, I first went into Central Administration, Application Management and then "Create or Extend Web Application"
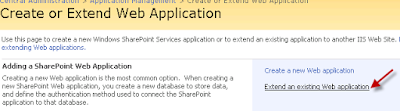
Then "Extend an Existing Web Application"
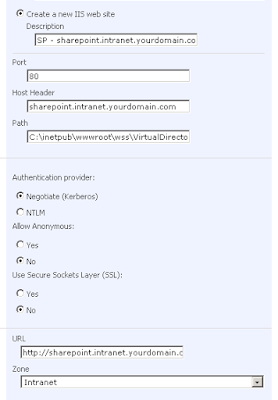
Then click the drop down for Web Application and make sure the right website is selected. Then fill in the port (in almost all cases its 80) and the Host Header (REQUIRED - since we'll be stacking onto the same Port as other Sites on the same server). I use Kerberos but if you haven't set up your SPNs then choose something else. Make sure to choose the Intranet zone (or whatever yours corresponds to)
 Now either Restart IIS manually, or iisreset /noforce, or if you're bored reboot the whole server.
When it comes back you should be done. Test it from an external location.
 For reference, here's my AAM settings (modified of course.) And I wouldn't worry if yours don't match exactly, sharepoint is just weird that way.
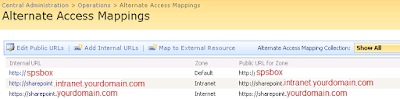
Note: If you had anything published on the original Default site, you'll need to duplicate it into the new Host Header site. i.e. /images or other static content, etc using the IIS Manager. It is, for all intents and purposes, a completely different site.
Useful References:
Microsoft reference - at the bottom talks about Extending Web Applications
http://technet.microsoft.com/en-us/library/cc268368.aspx
Tutorial on publishing sharepoint through ISA
http://www.isaserver.org/tutorials/How-to-Publish-Microsoft-Sharepoint-Service-ISA-Server-2006.html
AAM
http://technet.microsoft.com/en-us/library/cc288609.aspx
More on extending
http://sharepointnotes.wordpress.com/2008/03/02/sharepoint-extranet-solutions-with-isa-server-2006-part-2-creating-the-extranet-web-application/
And more AAM
http://blogs.catapultsystems.com/matthew/archive/2008/05/19/search-results-and-aam.aspx
At this point I was pretty sure AAM (Alternate Access Mapping) was involved but I just wasn't sure why Search was so special. It took a couple of hours but I figured it out. There's a ton of good websites out there that show you how to set up sharepoint and ISA server so I'm just going to focus on what I missed and skip the basics.
Mistakes:
1. I had never 'Extended' the Web Application. I only had a Default Zone Web Application.
2. My ISA publishing rule was using the Intranet Zone name for the server. Which means that all external users were being seen by the Sharepoint server as using the Intranet Zone even thought they were using the Internet address. (i.e. They typed in sharepoint.yourdomain.com and the ISA server sent on sharepoint.intranet.yourdomain.com). This was never a problem before search but it became one afterwards.

Warning: I am by no means an expert on Sharepoint, I just play one at work. The following comprises the most critical things I had to change to get mine to work. Always back up your systems before making changes to production environments.
So to fix it, I first went into Central Administration, Application Management and then "Create or Extend Web Application"

Then "Extend an Existing Web Application"

Then click the drop down for Web Application and make sure the right website is selected. Then fill in the port (in almost all cases its 80) and the Host Header (REQUIRED - since we'll be stacking onto the same Port as other Sites on the same server). I use Kerberos but if you haven't set up your SPNs then choose something else. Make sure to choose the Intranet zone (or whatever yours corresponds to)
 Now either Restart IIS manually, or iisreset /noforce, or if you're bored reboot the whole server.
When it comes back you should be done. Test it from an external location.
 For reference, here's my AAM settings (modified of course.) And I wouldn't worry if yours don't match exactly, sharepoint is just weird that way.
Note: If you had anything published on the original Default site, you'll need to duplicate it into the new Host Header site. i.e. /images or other static content, etc using the IIS Manager. It is, for all intents and purposes, a completely different site.
Useful References:
Microsoft reference - at the bottom talks about Extending Web Applications
http://technet.microsoft.com/en-us/library/cc268368.aspx
Tutorial on publishing sharepoint through ISA
http://www.isaserver.org/tutorials/How-to-Publish-Microsoft-Sharepoint-Service-ISA-Server-2006.html
AAM
http://technet.microsoft.com/en-us/library/cc288609.aspx
More on extending
http://sharepointnotes.wordpress.com/2008/03/02/sharepoint-extranet-solutions-with-isa-server-2006-part-2-creating-the-extranet-web-application/
And more AAM
http://blogs.catapultsystems.com/matthew/archive/2008/05/19/search-results-and-aam.aspx
Wednesday, November 11, 2009
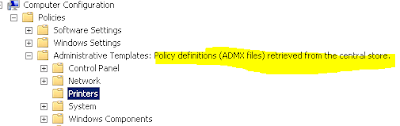
Why you can't find Hash Publication for BranchCache or Lanman Server under administrative templates.
If, like me, you forgot to update your Central Policy store when you upgraded your AD to 2008 R2, then these won't show up at all.
First confirm that you are using a Central Policy store by opening up any group policy in Group Policy Management and look for the highlighted text.
Once confirmed, now go to \\FQDN\SYSVOL\FQDN\policies\PolicyDefinitions (replace FQDN) and look at the dates. Now compare those with c:\windows\PolicyDefinitions on one of your 2008 R2 AD controllers. If the 2008 R2 has newer files, copy all the contents of that PolicyDefinitions folder to the \\FQDN\SYSVOL\FQDN\policies\PolicyDefinitions, replacing all that's there currently.
 Now if you close Group Policy Management, reopen it, and then go back into a policy you'll see new entries including the elusive "Lanman Server" which contains the "Hash Publication for BranchCache" value that you're looking for.

First confirm that you are using a Central Policy store by opening up any group policy in Group Policy Management and look for the highlighted text.

Once confirmed, now go to \\FQDN\SYSVOL\FQDN\policies\PolicyDefinitions (replace FQDN) and look at the dates. Now compare those with c:\windows\PolicyDefinitions on one of your 2008 R2 AD controllers. If the 2008 R2 has newer files, copy all the contents of that PolicyDefinitions folder to the \\FQDN\SYSVOL\FQDN\policies\PolicyDefinitions, replacing all that's there currently.
 Now if you close Group Policy Management, reopen it, and then go back into a policy you'll see new entries including the elusive "Lanman Server" which contains the "Hash Publication for BranchCache" value that you're looking for.
Sunday, November 8, 2009
The dreaded e00081d9 The Backup Exec job engine system service is not responding error
It's odd that every time I get backup exec 12.5 SP2 to a nice stable point something inevitably goes wrong. I suddenly started getting this error when the other half of my two backup jobs would run. I tried deleting/re-creating the jobs from policy, liveupdate, beutility- rebuild/repair/etc the db. Each time the backup job engine would puke and fail. Finally I gave up, made a copy of all the mdf and ldf files in the backup exec/data folder and uninstalled the program. And wiped out the whole backup exec folder for good measure. Then I re-installed it, liveupdated it, and then stopped the backup exec and sql services so I could re-swap out the mdf/ldf files. This restored all my jobs/policies/preferences/etc so I wouldn't have to start from scratch. But I still ran into the problem so I ran a manual backup job and it worked so I went ahead and deleted the whole Policy and selection list and made a new one from scratch.
After sleeping on it, it occurred to me that I had made one other change to one of the servers that gets backed up. This other server had died this week and since I only cared about the static files on it I had done a full rebuild of the server including upgrading the OS from 2k3 to 2k8 server. I kept the same name, folder names, etc and installed the beremote agent on it. In retrospect, I think after doing that I should have wiped out the .idr file that automatically gets generated at C:\Program Files\Symantec\Backup Exec\idr\Data. The more I think about it, the more likely it is that by changing the whole OS/setup of a previously snapped IDR box, I had confused the job engine to the point of failure. Of course, for now it's only a theory.
After sleeping on it, it occurred to me that I had made one other change to one of the servers that gets backed up. This other server had died this week and since I only cared about the static files on it I had done a full rebuild of the server including upgrading the OS from 2k3 to 2k8 server. I kept the same name, folder names, etc and installed the beremote agent on it. In retrospect, I think after doing that I should have wiped out the .idr file that automatically gets generated at C:\Program Files\Symantec\Backup Exec\idr\Data. The more I think about it, the more likely it is that by changing the whole OS/setup of a previously snapped IDR box, I had confused the job engine to the point of failure. Of course, for now it's only a theory.
Thursday, November 5, 2009
SQL 2008 Transactional Replication and initializing from a backup file
Now there's a fun process to go through, especially if like me you don't know jack about T-SQL. Let's face it, I currently know more words in Mandarin than I know commands in T-SQL; which isn't a lot. Having already done several tests with the automatic method of setting up Transactional Replication (where it does all the initial synch work for you and you just sit back and watch) I had assumed that Initializing from a backup would be a breeze. Famous last words.
There are some articles out there on the web but I found that most of them either assumed you knew more or just left out minor details. If, like me you're trying to set up replication of a huge database over a bandwidth limited connection or if you have some other reason that the initial setup has to be done from a backup file, then here's the walkthrough. By the way, I've only done the one-way Transactional Replication as in my situation this is just a failover site and will not need to send changes back to the original server.
Steps (order is very important)
Reference:
http://www.replicationanswers.com/NoSyncOn2005.asp
TIP 1: If you try to use a backup that was created before the publication was set up, it will fail.
TIP 2: If you get the Msg 21397 error mentioned in the link above, then you probably forgot to stop the Distribution cleanup agents and the server has thrown out some of the transactions that have occurred since the LSN (backup).
Step 10 is necessary because the distributor will keep waiting around for another subscriber and in the meanwhile your ms_replcommands table will continue to grow.
http://ilkirk.com/archive/2009/01/a-replication-fun-fact/
Now we'll move on to the actual subscription scripts that you will run around step 8. (I'll assume that you set up the Publication through the GUI keeping in mind not to create a snapshot). If you don't know how to create the publication, see the help file or http://msdn.microsoft.com/en-us/library/ms151160.aspx
On the Publishing server we're going to use sp_addsubscription to define the initial subscription, then we'll run sp_addpullsubscription and sp_addpullsubscription_agent on the Subscriber machine. I created the subscriber scripts by using the GUI and choosing the export to script option at the end instead of executing the change. Then I modified the subscriber scripts and that's how I recommend that you set them up. My generalized scripts below should just be used as a guide.
Script 1: (Yes, the exec line is really long. Run on publisher)
-----BEGIN: Script to be run at Publisher 'Publishing_SQLServerName'------------
------- backupdevicename has to be located on the Publisher machine -------
use [Your_DB_Name]
exec sp_addsubscription @publication = N'Your_DB_Name_PUB', @subscriber = N'Subscribing_SQLServerName', @destination_db = N'Your_DB_Name', @sync_type = N'initialize with backup', @backupdevicetype = 'disk', @backupdevicename = 'e:\BACKUP\Your_DB_Name090209.bak', @subscription_type = N'pull', @update_mode = N'read only'
GO
-------END: Script to be run at Publisher 'Publishing_SQLServerName'-------------
Replace Your_DB_Name, Your_DB_Name_PUB, Subscribing_SQLServerName, and the location of the backup with appropriate values.
Script 2: (run at the subscriber sql server)
-----BEGIN: Script to be run at Subscriber 'Subscribing_SQLServerName'-----------------
use [Your_DB_Name]
exec sp_addpullsubscription @publisher = N'Publishing_SQLServerName', @publication = N'Your_DB_Name_PUB', @publisher_db = N'Your_DB_Name', @independent_agent = N'True', @subscription_type = N'pull', @description = N'', @update_mode = N'read only', @immediate_sync = 0
-----END: Script to be run at Subscriber 'Subscribing_SQLServerName'-----------------
Same drill as before with changing out the placeholders with actual names.
Script 3: (still on the subscriber). Now we're going to set up the agents which will handle the data pulls for us. (once again, a really long exec command)
-----BEGIN: Script to be run at Subscriber 'Subscribing_SQLServerName'-----------------
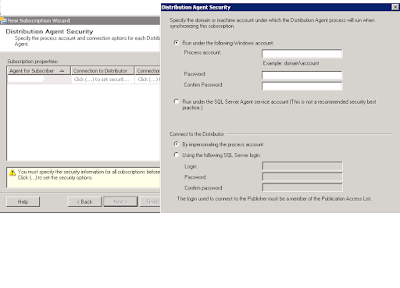
exec sp_addpullsubscription_agent @publisher = N'Publishing_SQLServerName', @publisher_db = N'Your_DB_Name', @publication = N'Your_DB_Name_PUB', @distributor = N'Publishing_SQLServerName', @distributor_security_mode = 0, @distributor_login = N'dist_login_acct', @distributor_password = N'dist_password', @enabled_for_syncmgr = N'False', @frequency_type = 64, @frequency_interval = 0, @frequency_relative_interval = 0, @frequency_recurrence_factor = 0, @frequency_subday = 0, @frequency_subday_interval = 0, @active_start_time_of_day = 0, @active_end_time_of_day = 235959, @active_start_date = 20090902, @active_end_date = 99991231, @alt_snapshot_folder = N'', @working_directory = N'', @use_ftp = N'False', @job_login = N'domain\username', @job_password =N'user_password', @publication_type = 0
GO
-----END: Script to be run at Subscriber 'Subscribing_SQLServerName'-----------------
If you went through the GUI you will have seen where it prompted you for user accounts. The windows account is needed to access the Distribution share on the publisher that houses the snapshots(if we were using them) and updates. Fortunately both machines were on the same domain so that was easy for me. For the distributor I created a SQL login on both servers with the same username/password and granted that user rights on the publishing server. This account is used by the agents on the subscriber to check the distribution database on the publisher.
 Provided you didn't get any errors when you ran those scripts, you'll want to start monitoring the replication now. Right click on the Subscription and View Synchronization Status.
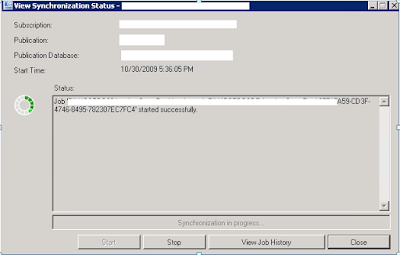
Now right-click in SQL Management Studio on Replication and Launch the Replication Monitor. Drill down to the publisher (add if it need be) and then drill down to the publication. Right click on the right panel and View Details. The window that pops up is really useful to see how replication is going.
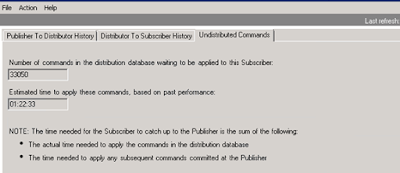 What's great about that window is that you can watch the # of pending transactions that are waiting to be synch'd. Initially this will be a very big number until it catches up. At this point the only thing left are steps 10 and 11. Turn off the flag on the publisher for Initializing from backup and actually go into the database and replica to see if data is being transferred properly. (taking into account replication intervals, etc)
TIP 3: If you get this error: The distribution agent failed to create temporary files in C:\Program Files\Microsoft SQL Server\100\COM directory. System returned errorcode 5.
Then you need to grant the user that the Distribution Agent is running as Write access to that directory. http://support.microsoft.com/default.aspx/kb/956032
TIP 4: You may start getting errors in your DB related to "Length of LOB data". This occurs because by default it only supports chunks up to 65535. Go into SQL management Studio, right click on the server and choose properties. Set the Max Text Replication Size to something higher. Or do what I did and use the max value of 2147483647.
TIP 5: I found a good reference book that just focuses on SQL replication called "Pro SQL Server 2008 Replication" (ISBN13: 9781430218074). It explains in detail the mechanisms behind replication and covers all types of replication for SQL and how to choose the one that's right for you.
There are some articles out there on the web but I found that most of them either assumed you knew more or just left out minor details. If, like me you're trying to set up replication of a huge database over a bandwidth limited connection or if you have some other reason that the initial setup has to be done from a backup file, then here's the walkthrough. By the way, I've only done the one-way Transactional Replication as in my situation this is just a failover site and will not need to send changes back to the original server.
Steps (order is very important)
- Set up the Distributer – database and share – one time setup
- Set up Publisher on source server - Don’t use either checkbox for snapshot.
- Enable the flag under the Publication properties to allow “initialize from backup”. (Right-click on the publication, properties)
- Disable the distribution cleanup agents. (Under SQL agent jobs)
- Make a Full backup of the database. Keep a local copy as you'll need it later.
- Copy database to other site. (Over the network, courier pigeon, magic, whatever)
- Restore database with the same name
- Create pull subscription on the destination server. (see scripts provided below)
- Check status – Replication monitor -> drill down to publisher (add if needed), “View details on the subscription on the right to get a status report (3rd tab in window that pops up)
- After it’s done synching up, turn off the “initialize from backup” flag or else the cache it keeps will never shrink. And re-enable the distribution cleanup agents.
- TEST IT. Check the tables after synchronization and then check again after new transactions have been sent. (Wait a few minutes after each replication interval to give it time to catch up).
Reference:
http://www.replicationanswers.com/NoSyncOn2005.asp
TIP 1: If you try to use a backup that was created before the publication was set up, it will fail.
TIP 2: If you get the Msg 21397 error mentioned in the link above, then you probably forgot to stop the Distribution cleanup agents and the server has thrown out some of the transactions that have occurred since the LSN (backup).
Step 10 is necessary because the distributor will keep waiting around for another subscriber and in the meanwhile your ms_replcommands table will continue to grow.
http://ilkirk.com/archive/2009/01/a-replication-fun-fact/
Now we'll move on to the actual subscription scripts that you will run around step 8. (I'll assume that you set up the Publication through the GUI keeping in mind not to create a snapshot). If you don't know how to create the publication, see the help file or http://msdn.microsoft.com/en-us/library/ms151160.aspx
On the Publishing server we're going to use sp_addsubscription to define the initial subscription, then we'll run sp_addpullsubscription and sp_addpullsubscription_agent on the Subscriber machine. I created the subscriber scripts by using the GUI and choosing the export to script option at the end instead of executing the change. Then I modified the subscriber scripts and that's how I recommend that you set them up. My generalized scripts below should just be used as a guide.
Script 1: (Yes, the exec line is really long. Run on publisher)
-----BEGIN: Script to be run at Publisher 'Publishing_SQLServerName'------------
------- backupdevicename has to be located on the Publisher machine -------
use [Your_DB_Name]
exec sp_addsubscription @publication = N'Your_DB_Name_PUB', @subscriber = N'Subscribing_SQLServerName', @destination_db = N'Your_DB_Name', @sync_type = N'initialize with backup', @backupdevicetype = 'disk', @backupdevicename = 'e:\BACKUP\Your_DB_Name090209.bak', @subscription_type = N'pull', @update_mode = N'read only'
GO
-------END: Script to be run at Publisher 'Publishing_SQLServerName'-------------
Replace Your_DB_Name, Your_DB_Name_PUB, Subscribing_SQLServerName, and the location of the backup with appropriate values.
Script 2: (run at the subscriber sql server)
-----BEGIN: Script to be run at Subscriber 'Subscribing_SQLServerName'-----------------
use [Your_DB_Name]
exec sp_addpullsubscription @publisher = N'Publishing_SQLServerName', @publication = N'Your_DB_Name_PUB', @publisher_db = N'Your_DB_Name', @independent_agent = N'True', @subscription_type = N'pull', @description = N'', @update_mode = N'read only', @immediate_sync = 0
-----END: Script to be run at Subscriber 'Subscribing_SQLServerName'-----------------
Same drill as before with changing out the placeholders with actual names.
Script 3: (still on the subscriber). Now we're going to set up the agents which will handle the data pulls for us. (once again, a really long exec command)
-----BEGIN: Script to be run at Subscriber 'Subscribing_SQLServerName'-----------------
exec sp_addpullsubscription_agent @publisher = N'Publishing_SQLServerName', @publisher_db = N'Your_DB_Name', @publication = N'Your_DB_Name_PUB', @distributor = N'Publishing_SQLServerName', @distributor_security_mode = 0, @distributor_login = N'dist_login_acct', @distributor_password = N'dist_password', @enabled_for_syncmgr = N'False', @frequency_type = 64, @frequency_interval = 0, @frequency_relative_interval = 0, @frequency_recurrence_factor = 0, @frequency_subday = 0, @frequency_subday_interval = 0, @active_start_time_of_day = 0, @active_end_time_of_day = 235959, @active_start_date = 20090902, @active_end_date = 99991231, @alt_snapshot_folder = N'', @working_directory = N'', @use_ftp = N'False', @job_login = N'domain\username', @job_password =N'user_password', @publication_type = 0
GO
-----END: Script to be run at Subscriber 'Subscribing_SQLServerName'-----------------
If you went through the GUI you will have seen where it prompted you for user accounts. The windows account is needed to access the Distribution share on the publisher that houses the snapshots(if we were using them) and updates. Fortunately both machines were on the same domain so that was easy for me. For the distributor I created a SQL login on both servers with the same username/password and granted that user rights on the publishing server. This account is used by the agents on the subscriber to check the distribution database on the publisher.
 Provided you didn't get any errors when you ran those scripts, you'll want to start monitoring the replication now. Right click on the Subscription and View Synchronization Status.
Now right-click in SQL Management Studio on Replication and Launch the Replication Monitor. Drill down to the publisher (add if it need be) and then drill down to the publication. Right click on the right panel and View Details. The window that pops up is really useful to see how replication is going.
 What's great about that window is that you can watch the # of pending transactions that are waiting to be synch'd. Initially this will be a very big number until it catches up. At this point the only thing left are steps 10 and 11. Turn off the flag on the publisher for Initializing from backup and actually go into the database and replica to see if data is being transferred properly. (taking into account replication intervals, etc)
TIP 3: If you get this error: The distribution agent failed to create temporary files in C:\Program Files\Microsoft SQL Server\100\COM directory. System returned errorcode 5.
Then you need to grant the user that the Distribution Agent is running as Write access to that directory. http://support.microsoft.com/default.aspx/kb/956032
TIP 4: You may start getting errors in your DB related to "Length of LOB data". This occurs because by default it only supports chunks up to 65535. Go into SQL management Studio, right click on the server and choose properties. Set the Max Text Replication Size to something higher. Or do what I did and use the max value of 2147483647.
TIP 5: I found a good reference book that just focuses on SQL replication called "Pro SQL Server 2008 Replication" (ISBN13: 9781430218074). It explains in detail the mechanisms behind replication and covers all types of replication for SQL and how to choose the one that's right for you.
Tuesday, September 29, 2009
Getting started with MDT 2010 and windows 7
Microsoft recently released an updated version of their Deployment Toolkit - version 2010. As with all Microsoft products, the first few versions start out 'okay' and then by the 3rd or 4th version become a feature rich juggernaut. And we're only going to just scratch the surface today on this product.
Let's start by downloading the Toolkit: (Preferably one that matches your processor type)
http://www.microsoft.com/downloads/details.aspx?familyid=3bd8561f-77ac-4400-a0c1-fe871c461a89&displaylang=en
Other things to have ready:
Windows 7 Enterprise DVD or ISO (Ultimate will probably work but I haven't tried it).
A simple application DVD/ISO/folder for something like Office or acrobat reader.
A blank CD or a usb flash drive.
Once you have it downloaded, install it and then open the Deployment Workbench. From there go under Information Center, then Components.
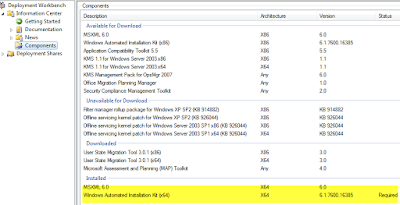 This view will show you what components are already installed on your machine and gives you the option to download and install the rest. For now we need MSXML 6.0 and the WAIK installed. If you don't have them, click on each one and then click on Download (or Queue). The WAIK is over a GB so it may take a while! I know this gloss-over won't do this toolkit justice but feel free to look over the other optional downloads later on. Once you get to the point where both of those show up under 'Installed' then proceed.
If you take a peek under the "Getting Started" tab they've got a diagram which will either enlighten you or give you a migraine depending on your level of familiarity with using Microsoft Deployment tools.
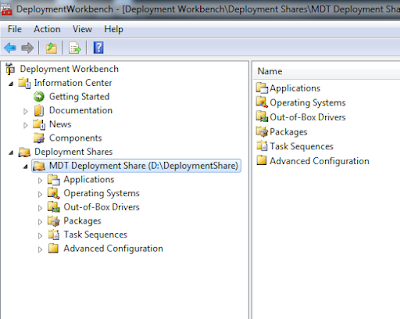
Skip down to the Deployment Shares icon, right click it and choose to create a new Deployment Share. This deployment share is going to be the heart of the whole project. All applications, drivers, OS images, etc will go into subfolders of this folder and all your remote clients will be connecting to it to install from. For now just leave all the default names. Make sure the drive you place this on has at least 10GB for this example project. Now your console should look like this:
Now right click on Operating Systems and then "Import Operating System". Select "Full set of source files" and then point it to your Windows7 source files location. (DVD, a mounted ISO, folder, etc). Leave the name as is for default and just continue through.
Now right click on Applications and choose "New Application". The first radio button will copy over the whole source. The second will just take a UNC share name and that's what the client will connect to directly. Choose whichever you want for now and hit Next. Provide an application name like Office 2007 or something, then a source folder, and finally a command line. (If you are publishing an office program, try using the customization setup to get nice, silent installs).
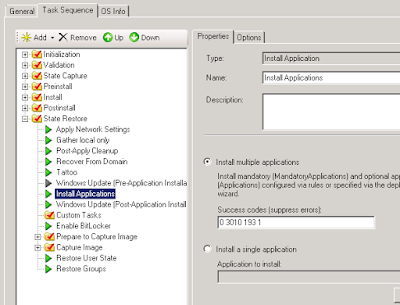
Now we need to create a Task Sequence. Give it an ID like 1 or Test1, etc and a name. On the next screen choose "Standard Client Task Sequence". Choose an OS. Product Key is optional at this point. Organization name on the next screen. Default admin password, next. Finish it up.
These tasks are what you'll be prompted with later when you boot off the media that we're going to make.
You can also choose to add in Drivers to be injected at build time. It appears to be pretty much automatic once you add them.
Now right click on your MDT Deployment Share and choose (Update Deployment Share). This will generate new ISO's, etc. You should do this after any major change to make sure it's up to date. Now open Windows Explorer and go to your deployment share folder. Under it you will find a Boot folder which contains ISO's and WIM's for x86 and .64. I'm doing all x64 personally so I'm only using the LiteTouchPE_x64.iso. Burn this ISO to a CD or you can mount it and transfer it to a USB stick.
Quick note on how to do the USB stick method:
run diskpart from a command prompt.
run list disk to find out which one is your usb drive
select disk 1 (or whatever yours is)
clean
create partition primary
select partition 1
active
format fs=fat32
assign
exit
Then copy the contents of the mounted litetouch ISO file to the root of the USB drive.
xcopy :\*.* :\*.* /s /e /f
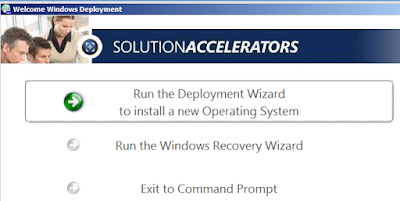
Now boot a computer off your shiny new image and eventually you'll see the Microsoft Solution Accelerator screen: (in case you're wondering, I'm using Hyper-V which makes capturing these images easier and testing much faster.)
Choose the first option and on the next screen provide a user/pass/domain so that the installation can connect to network shares, etc. Choose the Task we created on the next screen that pops up. Then by default it generates a random computer name, you can rename this as needed. Then you can tell it to auto-join the domain when it's done by providing the missing information in each of the fields. Skip past the USMT screen, choose a language, choose a time zone, check off the application(s) to install (You should see your application listed here).
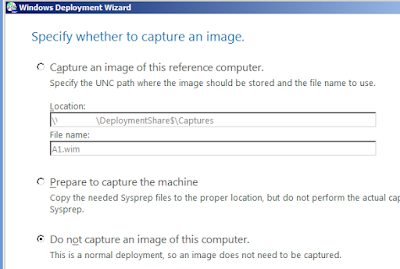
On this next screen you can choose to have it automatically capture a reference image at the end for you. This is useful if you have a WDS server or if you want to import the completed image back into the MDT server later as a new base OS image. If you choose this option it'll automatically run Sysprep, reboot, and upload for you. For now you can just choose not to do it.
 The next screen let's you set up BitLocker! Pretty snazzy.
And then the final screen has a "Begin" button.
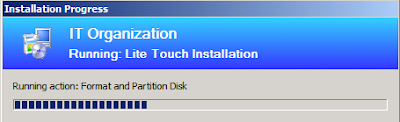
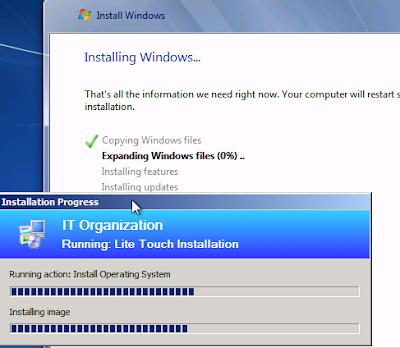
Now it'll install the OS for you, then the application(s), and if you went with the capture, then sysprep and capture.
The install will reboot itself as needed, etc. At this point this tutorial is done. If you're feeling confident, I recommend playing around with manually editing Task Sequences to get a feel for just how customizable this system is. You can insert applications, insert reboots, schedule windows updates before and after application installs.
Let's start by downloading the Toolkit: (Preferably one that matches your processor type)
http://www.microsoft.com/downloads/details.aspx?familyid=3bd8561f-77ac-4400-a0c1-fe871c461a89&displaylang=en
Other things to have ready:
Windows 7 Enterprise DVD or ISO (Ultimate will probably work but I haven't tried it).
A simple application DVD/ISO/folder for something like Office or acrobat reader.
A blank CD or a usb flash drive.
Once you have it downloaded, install it and then open the Deployment Workbench. From there go under Information Center, then Components.
 This view will show you what components are already installed on your machine and gives you the option to download and install the rest. For now we need MSXML 6.0 and the WAIK installed. If you don't have them, click on each one and then click on Download (or Queue). The WAIK is over a GB so it may take a while! I know this gloss-over won't do this toolkit justice but feel free to look over the other optional downloads later on. Once you get to the point where both of those show up under 'Installed' then proceed.
If you take a peek under the "Getting Started" tab they've got a diagram which will either enlighten you or give you a migraine depending on your level of familiarity with using Microsoft Deployment tools.
Skip down to the Deployment Shares icon, right click it and choose to create a new Deployment Share. This deployment share is going to be the heart of the whole project. All applications, drivers, OS images, etc will go into subfolders of this folder and all your remote clients will be connecting to it to install from. For now just leave all the default names. Make sure the drive you place this on has at least 10GB for this example project. Now your console should look like this:

Now right click on Operating Systems and then "Import Operating System". Select "Full set of source files" and then point it to your Windows7 source files location. (DVD, a mounted ISO, folder, etc). Leave the name as is for default and just continue through.
Now right click on Applications and choose "New Application". The first radio button will copy over the whole source. The second will just take a UNC share name and that's what the client will connect to directly. Choose whichever you want for now and hit Next. Provide an application name like Office 2007 or something, then a source folder, and finally a command line. (If you are publishing an office program, try using the customization setup to get nice, silent installs).
Now we need to create a Task Sequence. Give it an ID like 1 or Test1, etc and a name. On the next screen choose "Standard Client Task Sequence". Choose an OS. Product Key is optional at this point. Organization name on the next screen. Default admin password, next. Finish it up.
These tasks are what you'll be prompted with later when you boot off the media that we're going to make.
You can also choose to add in Drivers to be injected at build time. It appears to be pretty much automatic once you add them.
Now right click on your MDT Deployment Share and choose (Update Deployment Share). This will generate new ISO's, etc. You should do this after any major change to make sure it's up to date. Now open Windows Explorer and go to your deployment share folder. Under it you will find a Boot folder which contains ISO's and WIM's for x86 and .64. I'm doing all x64 personally so I'm only using the LiteTouchPE_x64.iso. Burn this ISO to a CD or you can mount it and transfer it to a USB stick.
Quick note on how to do the USB stick method:
run diskpart from a command prompt.
run list disk to find out which one is your usb drive
select disk 1 (or whatever yours is)
clean
create partition primary
select partition 1
active
format fs=fat32
assign
exit
Then copy the contents of the mounted litetouch ISO file to the root of the USB drive.
xcopy :\*.* :\*.* /s /e /f
Now boot a computer off your shiny new image and eventually you'll see the Microsoft Solution Accelerator screen: (in case you're wondering, I'm using Hyper-V which makes capturing these images easier and testing much faster.)

Choose the first option and on the next screen provide a user/pass/domain so that the installation can connect to network shares, etc. Choose the Task we created on the next screen that pops up. Then by default it generates a random computer name, you can rename this as needed. Then you can tell it to auto-join the domain when it's done by providing the missing information in each of the fields. Skip past the USMT screen, choose a language, choose a time zone, check off the application(s) to install (You should see your application listed here).
On this next screen you can choose to have it automatically capture a reference image at the end for you. This is useful if you have a WDS server or if you want to import the completed image back into the MDT server later as a new base OS image. If you choose this option it'll automatically run Sysprep, reboot, and upload for you. For now you can just choose not to do it.
 The next screen let's you set up BitLocker! Pretty snazzy.
And then the final screen has a "Begin" button.
Now it'll install the OS for you, then the application(s), and if you went with the capture, then sysprep and capture.


The install will reboot itself as needed, etc. At this point this tutorial is done. If you're feeling confident, I recommend playing around with manually editing Task Sequences to get a feel for just how customizable this system is. You can insert applications, insert reboots, schedule windows updates before and after application installs.

Tuesday, September 22, 2009
Symantec Endpoint Protection 11.0.5 released - finally some windows 7 support
Now the last hurdle has been removed for the start of my Windows 7 deployments; lack of a working anti-virus. Endpoint 11.0.5 was released to gold/premium customers yesterday as see on the forums and today I found it on my multi-tier page at Fileconnect. So those of you with active maintenance/support contracts with Symantec should be able to download it now.
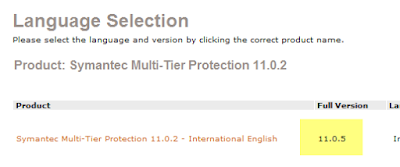

Supposedly this new version also has some nice improvements for group updates. Windows 2008 R2 is now fully supported. Release notes here:
http://service1.symantec.com/SUPPORT/ent-security.nsf/docid/2009072315130848


Supposedly this new version also has some nice improvements for group updates. Windows 2008 R2 is now fully supported. Release notes here:
http://service1.symantec.com/SUPPORT/ent-security.nsf/docid/2009072315130848
Wednesday, September 9, 2009
powershell script to kill process by name that's been running for more than x minutes
If you ever have some badly written program that you have to use that leaves orphaned processes running in memory and you need to end them - but only the older ones then use this script. You only have change the name of the process and the number of minutes that it has to have been running for. (Note: It's a negative number from the current time).
##############################################
#
# Powershell script to kill off orphaned processes
# Free for any Use
#
# Script is not 'signed' so you either have to digitally sign it
# or run 'Set-ExecutionPolicy remotesigned' or 'Set-ExecutionPolicy
# Unrestricted' from Powershell at least once prior to using this script.
#
# Batch File syntax: powershell "& 'c:\foldername\killorphanproc.ps1'"
#
# To figure out the process name you can go into powershell and just
# run get-process by itself for a listing
#
# Script is provided 'As-Is' with no support.
#
##############################################
#Get list of processes matching the name and older than x minutes.
$orphanProcs = get-process | where {($_.Name -eq "winword") -and '
($_.StartTime -lt (get-date).addminutes(-30))}
#Check if list is Null and if not kill them all:
If ($orphanProcs) {
#display list
$orphanProcs
#kill list
$orphanProcs | foreach { $_.Kill() }
} Else {
echo "no processes found older than specified"
}
##############################################
#
# Powershell script to kill off orphaned processes
# Free for any Use
#
# Script is not 'signed' so you either have to digitally sign it
# or run 'Set-ExecutionPolicy remotesigned' or 'Set-ExecutionPolicy
# Unrestricted' from Powershell at least once prior to using this script.
#
# Batch File syntax: powershell "& 'c:\foldername\killorphanproc.ps1'"
#
# To figure out the process name you can go into powershell and just
# run get-process by itself for a listing
#
# Script is provided 'As-Is' with no support.
#
##############################################
#Get list of processes matching the name and older than x minutes.
$orphanProcs = get-process | where {($_.Name -eq "winword") -and '
($_.StartTime -lt (get-date).addminutes(-30))}
#Check if list is Null and if not kill them all:
If ($orphanProcs) {
#display list
$orphanProcs
#kill list
$orphanProcs | foreach { $_.Kill() }
} Else {
echo "no processes found older than specified"
}
Thursday, August 20, 2009
Windows 7 x64 and my old HP Laserjet 1100
It's always depressing when you install the latest OS only to find that your old reliable peripheral just isn't listed anymore. I scanned down the HP list twice and even tried the HP website (which doesn't even have a Vista one since it was on the DVD). I couldn't even get it to accept the driver off the Vista x64 install DVD.
And then a ray of hope, I found a link to the Microsoft hardware update catalog. I did a search for my laserjet 1100 and it returned results that were listed for Windows 7.
http://catalog.update.microsoft.com/v7/site/Search.aspx?q=%22windows%207%20laserjet%201100
You just add the drivers you need to your basket (it's kinda like shopping but the drivers are free) and then you just view the basket and download your drivers.
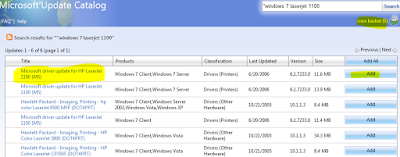
One hitch, the filename was so long that winzip wasn't happy. So I just renamed the .cab file to something shorter and then I was able to extract the files. Then I just browsed to it with the "Have Disk..." option and voila. My printer works now.
Wednesday, August 19, 2009
Windows 2008 R2 backup exec and failure occurred accessing the Writer metadata - Workaround
Updated 9/7/09
Nothing tramples the joy of playing with a new operating system faster than finding out that your vendor is being a deadbeat and hasn't put out a compatible release yet. You'd think that out of the army of programmers that Symantec has that they'd have at least one technet or msdn subscription and that they'd have started working out compatibility issues in the meager half year that the betas were available. I was also amused to find that on their forums some of their staff didn't realize that the RTM was out yet for Windows 7 and 2008 R2... But I digress.
So you're using Backup Exec 12.5 and trying to backup a Windows 2008 R2 RTM server using the Advanced Open File option and you get this error:
V-79-57344-65225 - AOFO: Initialization failure on: "\\MyServerName\System?State". Advanced Open File Option used: Microsoft Volume Shadow Copy Service (VSS).
Snapshot provider error (0xE000FEC9): A failure occurred accessing the Writer metadata
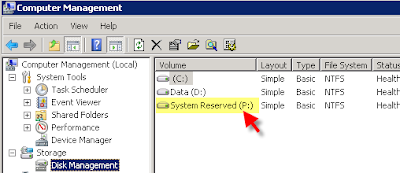
During the installation of Windows 2008 R2 RTM, it creates a Recovery Partition that's about 100MB. When the AOFO agent kicks in, it works with the VSS providers in the operating system to create snapshots. However, VSS really doesn't like those tiny partitions like the 100MB System Reserved (Recovery) partition. So at this point you have two choices.
I didn't really want to do option A yet as I'm not fully sure if that'll have any impact down the line so I decided on option B.
UPDATE: Some of you reported success with just assigning the partition a drive letter. Try it and if it works for you, then don't bother with the vssadmin parts.
I got pretty familiar with the VSSADMIN command while working with Hyper-V and backups so I knew that it could be used to redirect VSS snapshots to larger partitions. The problem I ran into is that it didn't like the fact that the System Reserved partition didn't have a drive letter. So I did the quick fix and used Disk Management to assign it a random drive letter - in this case P:
Then a quick drop to a command prompt and run vssadmin list volumes
C:\Users\Administrator>vssadmin list volumes
vssadmin 1.1 - Volume Shadow Copy Service administrative command-line tool
(C) Copyright 2001-2005 Microsoft Corp.
Volume path: P:\
Volume name: \\?\Volume{a2b716d3-8c1f-11de-a5ed-826d6f6e6973}\
Volume path: C:\
Volume name: \\?\Volume{a2b716d4-8c1f-11de-a5ed-826d6f6e6973}\
Volume path: D:\
Volume name: \\?\Volume{75c2418c-8c0e-11de-ae3c-001143dd2544}\
You'll note there's an entry for all your partitions. Now we set up a ShadowStorage for P:\ (100MB partition). ShadowStorage basically sets aside space on a volume to store snapshots of a volume. In this case I'm going to store snapshots of P: on D:
vssadmin add shadowstorage /For=P: /On=D: /MaxSize=1GB
And you have to put a MaxSize so I picked 1GB.
Now run vssadmin list shadowstorage to confirm the link has been set up.
C:\Users\Administrator>vssadmin list shadowstorage
vssadmin 1.1 - Volume Shadow Copy Service administrative command-line tool
(C) Copyright 2001-2005 Microsoft Corp.
Shadow Copy Storage association
For volume: (P:)\\?\Volume{a2b716d3-8c1f-11de-a5ed-826d6f6e6973}\
Shadow Copy Storage volume: (D:)\\?\Volume{75b2419c-8c5e-11de-af3b-001143dd23
44}\
Used Shadow Copy Storage space: 0 B (0%)
Allocated Shadow Copy Storage space: 0 B (0%)
Maximum Shadow Copy Storage space: 1 GB (4%)
If you have any other volumes configured for Shadow Copies you'll also see them listed there. (i.e. If you enabled "Previous Versions" for a file share, etc)
At this point you're done. I was able to do a successful backup of the server with the AOFO (Advanced open file option) enabled after making this change. My backup seemed a bit slow but it is an older server so I can't be sure if speed was a machine issue or an R2/Symantec issue.
Nothing tramples the joy of playing with a new operating system faster than finding out that your vendor is being a deadbeat and hasn't put out a compatible release yet. You'd think that out of the army of programmers that Symantec has that they'd have at least one technet or msdn subscription and that they'd have started working out compatibility issues in the meager half year that the betas were available. I was also amused to find that on their forums some of their staff didn't realize that the RTM was out yet for Windows 7 and 2008 R2... But I digress.
So you're using Backup Exec 12.5 and trying to backup a Windows 2008 R2 RTM server using the Advanced Open File option and you get this error:
V-79-57344-65225 - AOFO: Initialization failure on: "\\MyServerName\System?State". Advanced Open File Option used: Microsoft Volume Shadow Copy Service (VSS).
Snapshot provider error (0xE000FEC9): A failure occurred accessing the Writer metadata
- Option 1: Wait a month or so till a hotfix comes out.
- Option 2: Wait until Backup Exec 2010 comes out with official support for R2.
- Option 3: Fix the VSS issue that's causing it in the first place!
During the installation of Windows 2008 R2 RTM, it creates a Recovery Partition that's about 100MB. When the AOFO agent kicks in, it works with the VSS providers in the operating system to create snapshots. However, VSS really doesn't like those tiny partitions like the 100MB System Reserved (Recovery) partition. So at this point you have two choices.
- A) Wipe the partition out. (Note, if you used Diskpart to setup the drive instead of the windows 2008 setup program, this won't exist anyway.)
- B) Find a workaround for the VSS snapshot.
I didn't really want to do option A yet as I'm not fully sure if that'll have any impact down the line so I decided on option B.
UPDATE: Some of you reported success with just assigning the partition a drive letter. Try it and if it works for you, then don't bother with the vssadmin parts.
I got pretty familiar with the VSSADMIN command while working with Hyper-V and backups so I knew that it could be used to redirect VSS snapshots to larger partitions. The problem I ran into is that it didn't like the fact that the System Reserved partition didn't have a drive letter. So I did the quick fix and used Disk Management to assign it a random drive letter - in this case P:

Then a quick drop to a command prompt and run vssadmin list volumes
C:\Users\Administrator>vssadmin list volumes
vssadmin 1.1 - Volume Shadow Copy Service administrative command-line tool
(C) Copyright 2001-2005 Microsoft Corp.
Volume path: P:\
Volume name: \\?\Volume{a2b716d3-8c1f-11de-a5ed-826d6f6e6973}\
Volume path: C:\
Volume name: \\?\Volume{a2b716d4-8c1f-11de-a5ed-826d6f6e6973}\
Volume path: D:\
Volume name: \\?\Volume{75c2418c-8c0e-11de-ae3c-001143dd2544}\
You'll note there's an entry for all your partitions. Now we set up a ShadowStorage for P:\ (100MB partition). ShadowStorage basically sets aside space on a volume to store snapshots of a volume. In this case I'm going to store snapshots of P: on D:
vssadmin add shadowstorage /For=P: /On=D: /MaxSize=1GB
And you have to put a MaxSize so I picked 1GB.
Now run vssadmin list shadowstorage to confirm the link has been set up.
C:\Users\Administrator>vssadmin list shadowstorage
vssadmin 1.1 - Volume Shadow Copy Service administrative command-line tool
(C) Copyright 2001-2005 Microsoft Corp.
Shadow Copy Storage association
For volume: (P:)\\?\Volume{a2b716d3-8c1f-11de-a5ed-826d6f6e6973}\
Shadow Copy Storage volume: (D:)\\?\Volume{75b2419c-8c5e-11de-af3b-001143dd23
44}\
Used Shadow Copy Storage space: 0 B (0%)
Allocated Shadow Copy Storage space: 0 B (0%)
Maximum Shadow Copy Storage space: 1 GB (4%)
If you have any other volumes configured for Shadow Copies you'll also see them listed there. (i.e. If you enabled "Previous Versions" for a file share, etc)
At this point you're done. I was able to do a successful backup of the server with the AOFO (Advanced open file option) enabled after making this change. My backup seemed a bit slow but it is an older server so I can't be sure if speed was a machine issue or an R2/Symantec issue.
Tuesday, August 11, 2009
Windows 7 RTM, SQL 2008 dev edition x64 and invoke issues
While installing Windows 7 x64 is a breeze, putting SQL 2008 developer edition on top wasn't. Upon my first attempt the application compability warning popped up saying to install SQL 2k8 SP1 afterwards. Which would be fine if the install didn't die right after that. Or if MSDN had a already slipstreamed SP1 version on the download site...
So, for round 2 I used "Procedure 1" of this KB:
http://support.microsoft.com/kb/955392
Which basically walked me through download/extract the SP1 file and trying to launch setup with the PCUSource flag.
Setup.exe /PCUSource=C:\SP1
This did allow me to progress further and then I wound up with this error:
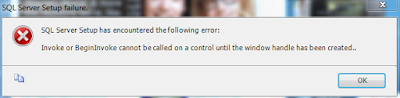
Invoke or BeginInvoke cannot be called on a control until the window handle has been created
So I dug around ye olde web a bit more and tried installing the SQLSupport.msi from the extracted SP1 files. That didn't work or at least not by itself. Another forum suggested rebooting but that didn't do squat either.
Finally, I had to resort to using "Procedure 2: Creating a merged drop" from the KB listed above. This time we had success.
I was going to reapply SP1 after the install finished as a just in case, but the SP1 patcher told me the machine was already updated and wouldn't let me proceed. So we'll call it a day.
So, for round 2 I used "Procedure 1" of this KB:
http://support.microsoft.com/kb/955392
Which basically walked me through download/extract the SP1 file and trying to launch setup with the PCUSource flag.
Setup.exe /PCUSource=C:\SP1
This did allow me to progress further and then I wound up with this error:

Invoke or BeginInvoke cannot be called on a control until the window handle has been created
So I dug around ye olde web a bit more and tried installing the SQLSupport.msi from the extracted SP1 files. That didn't work or at least not by itself. Another forum suggested rebooting but that didn't do squat either.
Finally, I had to resort to using "Procedure 2: Creating a merged drop" from the KB listed above. This time we had success.

I was going to reapply SP1 after the install finished as a just in case, but the SP1 patcher told me the machine was already updated and wouldn't let me proceed. So we'll call it a day.
Wednesday, July 15, 2009
How not to get stuck at Precopy preparation during a Dell system build
So I unpacked the mini cardboard crate that my new Dell Poweredge R700 came in and did the usual inventory (BTW, it's a sweet, sweet machine). I noticed that they hadn't shipped the usual Dell Openmanage CD pack and since I was going to do some testing, I kinda needed it to do some OS reloads. I went to the website and downloaded the two ISO files (1.9GB and 1.8GB) thinking they were two different DVDs. The nifty thing about ISO files is that you can split them up any way you want and your dvd burning software will burn DVDs for you no matter how broken the result may be.
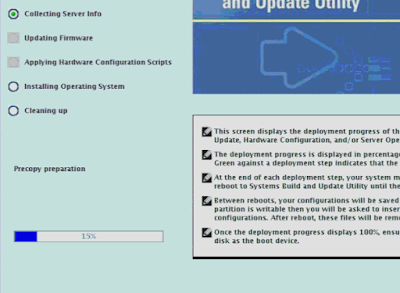
Anyway, I popped in the first DVD and booted off of it and then choose the System Builds and Update Utility. Then went through and choose my 2008 x64, time zone, etc and told it to apply. Then it stopped dead 15% into it at Precopy preparation.
Then began the troubleshooting. Suffice it to say that it wasn't any of the usual things. So I went back to the website to look for an older version of the OpenManage DVD. While digging through, I noticed an interesting comment buried down under 'Additional Information'.
CONCATENTATE. Yes, this critical piece of information was neither located under "Description" nor was it under "Important Information". Nay, it was located under "Additional Information" due to it not being important... Still at the end of the day it technically qualifies as a RTFM moment.
Imagine my surprise when I actually followed the instructions and then re-burned the DVD, my install worked correctly.
Anyway, I popped in the first DVD and booted off of it and then choose the System Builds and Update Utility. Then went through and choose my 2008 x64, time zone, etc and told it to apply. Then it stopped dead 15% into it at Precopy preparation.

Then began the troubleshooting. Suffice it to say that it wasn't any of the usual things. So I went back to the website to look for an older version of the OpenManage DVD. While digging through, I noticed an interesting comment buried down under 'Additional Information'.
To address a browser limitation around downloading large files (see Microsoft KB article 298618: You cannot download files that are 2 GB or larger - http://support.microsoft.com/kb/298618), the Dell Systems Management Tools and Documentation DVD as a single ISO file is no longer available for web download. You can do one of the following to get the content:
1) If you recently bought a server, please use the DVD that shipped with your hardware.
2) Download the two ISO file segments to a new, empty folder and concatenate them. Create a single DVD image file using the following commands:
Windows: copy /b OM* OM_610_SMTD_A00.iso
Linux: cat OM* > OM_610_SMTD_A00.iso
CONCATENTATE. Yes, this critical piece of information was neither located under "Description" nor was it under "Important Information". Nay, it was located under "Additional Information" due to it not being important... Still at the end of the day it technically qualifies as a RTFM moment.
Imagine my surprise when I actually followed the instructions and then re-burned the DVD, my install worked correctly.
Thursday, June 25, 2009
The unequivocal joy of sharepoint and one way trusted forests
Sharepoint is one of those products that's great once it's installed and configured. The configuration of Sharepoint, however, remains a real pain...
Today's challenge was setting up a WSS 3.0 server in the testing lab. The testing lab has a separate AD forest that only has a one-way trust to the production forest. The requirement was to have the WSS 3.0 server be part of the LABTEST domain AND be able to add users from both PROD and LABTEST to the application. Now that seems simple enough since the server already sees both domains as evidenced by the logon drop down box showing both domains. However, as I found out that doesn't mean that the web app will see both as well...
Finding the right command to run was a relatively easy google search which sent me to technet. Getting the syntax right and figuring out how to use the command correctly, now that was the fun part. With the assistance of these two blogs I got it to work:
http://blogs.msdn.com/joelo/archive/2007/03/08/cross-forest-multi-forest-configuration-additional-info.aspx
http://blogs.msdn.com/sharepoint/archive/2006/03/15/552331.aspx
First, in several discussion groups I got differing answers over whether or not the Sharepoint Application Pool Identity needed to be set to "Network Service" or as a domain user account in the domain (in my case, the LAB domain). I used a domain user account myself but had to make changes to the DCOM because my pool wouldn't start. (Component Services - Computers -> My Computer -> COM+ Applications -> DCOM CONFIG -> IIS WAMREG -> Properties -> Security Tab -> Edit Launch and Activation and just give the domain user permissions).
Next it's time to go to a command prompt and go to C:\Program Files\Common Files\Microsoft Shared\web server extensions\12\BIN . Now don't do what I did and think that just because you don't have a full web farm that you can skip the first instruction
stsadm.exe -o setapppassword -password SomeRandomPassword
Literally, it doesn't matter what is set to, as long as it's the same on all your front end servers. Even one lonely standalone installation...
The second command is a bit on the long side. The full syntax I ran (names and passwords have been changed for security purposes).
stsadm.exe -o setproperty -url http://WSSVM1 -pn "peoplepicker-searchadforests" -pv "forest:AD.PROD.COM,TrustUser,3t9sz9$b20pz;forest:LAB.LOCAL;domain:AD.PROD.COM,TrustUser,3t9sz9$b20pz;domain:LAB.LOCAL"
Where AD.PROD.COM is the FQDN of my forest and root domain and LAB.LOCAL is the FQDN of the forest and root domain. (keep in mind LAB.LOCAL is the domain that the WSS server is joined to. You'll notice that I had to use a domain user account in the Trusted domain in order to be able to search it since it's only a 1 way trust. Also, while digging I found on one of the forums that you DO need to include the domain the server is joined to as well as the domain you want to add to the search. I'm not really sure if it's necessary to include both the forest: and domain: for each but it works this way so I'm sticking to this method.
On a related note, there's also an alternative way to set this up that involves setting up shadowed, non-login accounts in the resource domain that map to the real users in the production domain. It's a bit more than I needed for this project but you might find it useful.
http://blogs.msdn.com/sharepoint/archive/2006/03/15/552331.aspx
Today's challenge was setting up a WSS 3.0 server in the testing lab. The testing lab has a separate AD forest that only has a one-way trust to the production forest. The requirement was to have the WSS 3.0 server be part of the LABTEST domain AND be able to add users from both PROD and LABTEST to the application. Now that seems simple enough since the server already sees both domains as evidenced by the logon drop down box showing both domains. However, as I found out that doesn't mean that the web app will see both as well...
Finding the right command to run was a relatively easy google search which sent me to technet. Getting the syntax right and figuring out how to use the command correctly, now that was the fun part. With the assistance of these two blogs I got it to work:
http://blogs.msdn.com/joelo/archive/2007/03/08/cross-forest-multi-forest-configuration-additional-info.aspx
http://blogs.msdn.com/sharepoint/archive/2006/03/15/552331.aspx
First, in several discussion groups I got differing answers over whether or not the Sharepoint Application Pool Identity needed to be set to "Network Service" or as a domain user account in the domain (in my case, the LAB domain). I used a domain user account myself but had to make changes to the DCOM because my pool wouldn't start. (Component Services - Computers -> My Computer -> COM+ Applications -> DCOM CONFIG -> IIS WAMREG -> Properties -> Security Tab -> Edit Launch and Activation and just give the domain user permissions).
Next it's time to go to a command prompt and go to C:\Program Files\Common Files\Microsoft Shared\web server extensions\12\BIN . Now don't do what I did and think that just because you don't have a full web farm that you can skip the first instruction
stsadm.exe -o setapppassword -password SomeRandomPassword
Literally, it doesn't matter what
The second command is a bit on the long side. The full syntax I ran (names and passwords have been changed for security purposes).
stsadm.exe -o setproperty -url http://WSSVM1 -pn "peoplepicker-searchadforests" -pv "forest:AD.PROD.COM,TrustUser,3t9sz9$b20pz;forest:LAB.LOCAL;domain:AD.PROD.COM,TrustUser,3t9sz9$b20pz;domain:LAB.LOCAL"
Where AD.PROD.COM is the FQDN of my forest and root domain and LAB.LOCAL is the FQDN of the forest and root domain. (keep in mind LAB.LOCAL is the domain that the WSS server is joined to. You'll notice that I had to use a domain user account in the Trusted domain in order to be able to search it since it's only a 1 way trust. Also, while digging I found on one of the forums that you DO need to include the domain the server is joined to as well as the domain you want to add to the search. I'm not really sure if it's necessary to include both the forest: and domain: for each but it works this way so I'm sticking to this method.
On a related note, there's also an alternative way to set this up that involves setting up shadowed, non-login accounts in the resource domain that map to the real users in the production domain. It's a bit more than I needed for this project but you might find it useful.
http://blogs.msdn.com/sharepoint/archive/2006/03/15/552331.aspx
Monday, June 8, 2009
vmrun - the grown up pain in the b** replacement for vmware-cmd
Back in the VMWare Server 1.x days stopping and starting up VMs from the command line was easy with 'vmware-cmd'. Now with Version 2.0 on my win2k3 boxes, I was forced to learn how to use the replacement - VMRUN.
I do understand that those who use the 'real' VMWARE products - ESX, vSphere, etc are quite used to using VMRUN. But if you're used to the old easy way and you're still stuck on the free versions, it's a bit tricky to get to work.
1. First off, you'll want to make sure your %PATH% variable is updated for the path to the vmrun command. ("C:\Program Files (x86)\VMware\VMware Server" on my x64 box)
2. Now open a command prompt and enter in vmrun list. This will show you a listing similar to this:
Total running VMs: 5
[standard] MYWEB2B/Win2k3R2STD_vmsrv2.0.vmx
where [standard] is the name of the default datastore in VMWare 2.x, MYWEB2B is the immediate folder under that in the file system, and then you have the filename. IT IS CASE SENSITIVE. The whole @#$% thing. If you mess that up, it will just tell you that "The virtual machine cannot be found".
3. Now that we know how to reference the vm files properly, now we need to specify the -T, -h, -u, and -p parameters. For some unknown reason, they don't appear to have a 'just run it as the server I'm sitting on and as the users I'm running this as' setting'.
Since you're using VMWare Server 2.0, you'll use -T server -h https://YourServerNameOrIP:8333/sdk (yes, it needs the sdk at the end)
and then provide a username/password (-u,-p) that is part of the administrators group on the host machine. (or if you've setup custom permissions in vmware, use one of those).
At this point, we should be able to construct this command to stop a VM gracefully:
vmrun -T server -h https://MyVMHostServer:8333/sdk -u vmadmin -p thepassword stop "[standard] MYWEB2B/Win2k3R2STD_vmsrv2.0.vmx" soft
You'll note that I introduced the 'stop' and 'soft' parameters. I'll give you three guesses what 'stop' does. The shutdown type option 'soft' will run the shutdown scripts for you for the VM to gracefully power it down. If you wanted to drop it uncleanly, just use 'hard' instead.
4. To Start it back up:
vmrun -T server -h https://MyVMHostServer:8333/sdk -u vmadmin -p thepassword start "[standard] MYWEB2B/Win2k3R2STD_vmsrv2.0.vmx"
Now combine this will some old style batch files and robocopy or xcopy and you've got a cheap way to make VM backups using Task Scheduler.
Note 1: Sometimes it just doesn't like netbios names.
Additional References:
VMRUN reference:
http://www.vmware.com/pdf/vix162_vmrun_command.pdf
Tips and Tricks for vmware server 2.0:
http://www.google.com/url?sa=t&source=web&ct=res&cd=1&url=http%3A%2F%2Fcommunities.vmware.com%2Fservlet%2FJiveServlet%2FpreviewBody%2F9394-102-2-6307%2FVMware%2520Server%25202.0%2520Tips%2520and%2520Tricks.pdf&ei=O4ItStbKI5WEtweRtM2vCA&rct=j&q=VMware+Server+2.0+Tips+and+Tricks.pdf&usg=AFQjCNH0ZvlIVPIrc8N_UQ64Y1efSoIO_Q
Wednesday, May 13, 2009
SoftOSD and Dell latitude laptops with the Nvidia chipset
I haven't confirmed it yet (and you'll understand why after I explain it) but I was told that the Dell Client Manager agent that comes with the Dell Management Console was causing issues on some D620 units that had the Nvidia chipset. On those units the entire LCD stopped working and require Dell to replace the motherboard and LCD. While this series of laptop has been plagued by Nvidia related issues, I was assured that these units had been running fine for a few years already and the sheer quantity of them failing at the same time was unlikely. The current suspect is the SoftOSD component which gets installed as part of the Dell Client Manager Agent. I looked up this component and it appears to be directly related to video card/output manipulation which only adds to our suspicions.
Also, these units seemed to all have been docked for at least some of the time prior to their failure and caused odd resets on the external monitor.
While this hasn't been verified yet, I would recommend that you uninstall the SoftOSD component off any D620 with the Nvidia chipset until we know one way or another. I'm not exactly willing to offer up any of my D620's for testing sacrifice. :)
Wednesday, April 22, 2009
KB 968078 (MS09-016) broke RDP on my ISA 2006 server
I really shouldn't be surprised since the last time I installed a hotfix for my ISA 2006 SP1 (win2k3 sp2 with all offloading, etc turned off) it broke RDP as well. I've already seen other forum hits on this now as well. I uninstalled it for now as being without RDP access to that server is not an option right now. Others have reported VPN problems and problems starting up standard edition with 4+ cpu cores. I'm not going to fool with it until I see a new patch come out or a resolution for this problem.
some other references to this issue:
http://forums.isaserver.org/m_2002085188/mpage_1/key_968078/tm.htm#2002085188
http://blogs.technet.com/isablog/archive/2009/04/18/ms09-012-and-isa-server-standard-edition-14109-failures.aspx
some other references to this issue:
http://forums.isaserver.org/m_2002085188/mpage_1/key_968078/tm.htm#2002085188
http://blogs.technet.com/isablog/archive/2009/04/18/ms09-012-and-isa-server-standard-edition-14109-failures.aspx
Wednesday, April 15, 2009
Symantec Mail Security for Exchange Named Piped Error updating license
Yes, you read that right, "The Named Piped could not be found" and because of that misspelling, you won't find the answer on their knowledge base.
I was trying to Add my new updated license files through the management console for Symantec Mail Security for Exchange and I got that error. The real error should read named pipe instead of piped and that's how you'll find it in their KB. When you get this cool error, you'll also notice the checkbox for "Enable Premium Antispam" gets whacked and your users start complaining about spam.
http://service1.symantec.com/support/ent-gate.nsf/docid/2007072606354254
Basically they'll have you stop both the services and manually wipe out the existing license files that are there. Then restart the services and try to add them again. Fortunately, this actually worked for me. Make sure to re-enable the premium antispam checkbox if you have that service.
Wednesday, April 8, 2009
Dell Management Console - free as in beer
So if you're like me and your budget this year doesn't seem to cover anything more than replacing machines that are on fire and burning to ashes and you happen to have a mostly or all Dell infrastructure, then the new DMC (Dell Management Console) may be for you. It's based on the Altiris Server platform and can help you with everything from hardware inventories to pushing bios updates and even individual bios settings such as enabling bitlocker support. It slices, it dices, and can even manage your dell kvms, network switches, etc. If you want to find out more, click the link below.
DMC:
http://www.dell.com/content/topics/global.aspx/sitelets/solutions/management/openmanage_console?c=us&cs=555&l=en&s=biz
Dell DMC FAQ:
http://en.community.dell.com/groups/dell_management_console/wiki/dmc-faq.aspx
When you're ready, just fill out the short registration on their website and get your two sets of license keys that you'll need for the install to activate the Dell Client Manager and the Dell Management Console. You'll also be provided with a link to download the ISO to install it.
http://www.dell.com/openmanage/register
First off you'll need a halfway decent box. Symantec/Altiris/Dell recommends a dual processor box with 4GB of RAM in it. It also has to be running some variant of Windows 2003 Server and it has to be a 32 bit version. To top it off, they also only current support IE7. A copy of SQL 2005 Express edition is included in the installer but the docs and the installer deem it necessary to remind you at every corner that the performance will be much better with a real copy of SQL server. You'll also need to have .net framework 3.5 installed. (I've currently got it running on a Octiplex 755 until I'm done testing.)
So next we're off to the install portion and the first opportunity to trip you up. One of the first things you'll notice in the screenshot below is that the Altiris Server product is listed in addition to the Dell components. If you check that it'll install an eval license and a bunch more junk that you don't really need.

Here's a screenshot if you had gone that route. You'll notice the boatload of Trial licenses. If you didn't choose that Altiris checkbox you should only seen 1 Trial one. (yeah, I don't know why either)
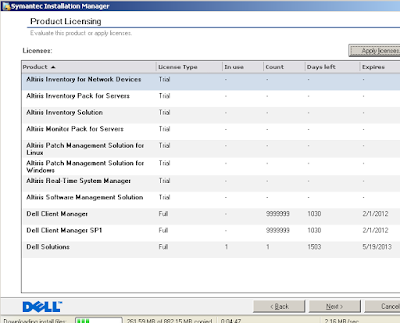
Prior to the screen above, you'll have been prompted for the license text files that you received earlier. It's pretty straightforward for the rest of the install; stuff like smtp server, user account to use, etc. As with all Symantec installers the pre-install checks will have some yellow warning triangles left. Since they're only warnings and not Errors you can proceed. (Don't get me wrong, their installer is nice but I just can't ever seem to get all the warnings to go away.)
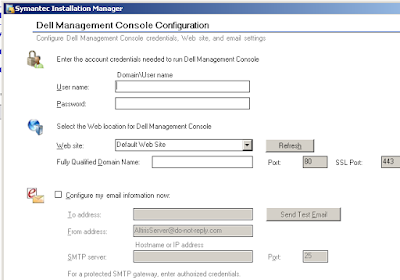
So it's installed, what now? Well, if it didn't do it for you, you'll need to open an IE7 window to https://yourservername.withfullfqdn.domain/ (provided you set up SSL ahead of time. (see README on the CD). Depending on whether or not you've ever used Altiris you may find the number of options and menus Daunting. Let's cut to the chase and click on the Home icon, then Dell Client Manager.
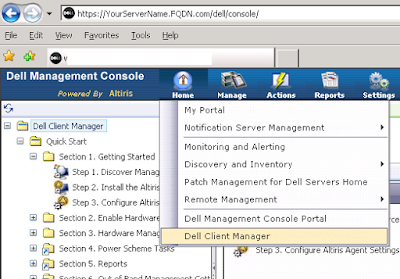
On the left you'll see a Quick Start tree which will walk you through network discovery, pushing the Altiris Agent, Agent settings, and quite importantly the Dell hardware client which will run on the Agents and collect hardware data for you. There's also some tutorial videos buried inside somewhere but I figured out more stuff just by clicking around and using the online help. You also have to keep in mind that the DMC only uses a fraction of the Altiris Server's abilities so you may see references to functions that you don't have.
You'll also notice that most things are turned off by default which is good. The idea is that you configure and enable them as you need them. To turn them on, just click on the red button and change it to On and then the Save button at the bottom.
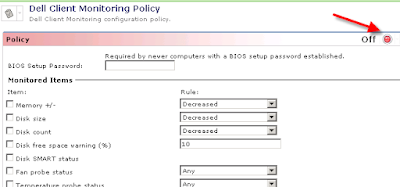
Provided you've made it past the agent installs, you'll soon see them show up in the dashboard. Below you'll see the 5 test machines in my environment listed.
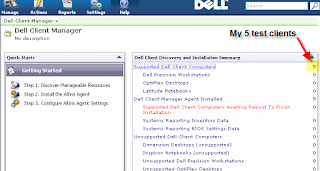
Click on it and it'll open up a series of Reports that allow you to drill down into each machine. (double-click in some places)
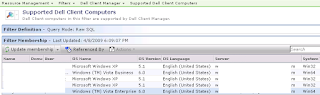

And yes, I too suffer from a 2 to 4 second delay on each page load.
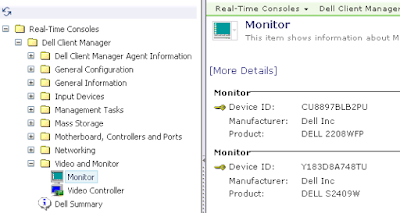
And as you can see it gives you quite a bit of information about the client machine. Sometimes it's useful to know things like video card models, bios version, etc prior to working on a desktop call.
I was also impressed with the granular control it provides over bios settings:

*note - while it does support bios passwords, it doesn't like passwords with special characters or spaces.
Well, that's all for today. I still have to play around with it a bit more to see what else it can do.
Notes:
1. The free DMC edition is what they call Standard edition. Which I'm under the impression means that there's a Pro version that has more bells and whistles for the right price.
2. I haven't played with any of their other recent IT openmanage products so I can't tell you how many of these features are new in comparison.
Wednesday, March 11, 2009
Word 2007 (winword.exe) won't open, no gui, process dies quickly
So I had a user report that they were having problems opening any office programs. They weren't being shown a GUI and when I checked the Task Manager I could see the process flash up for a few seconds then die. Running winword /a manually had the same effect. So I started troubleshooting:
1. Logged on as a different user - worked fine
2. Rebuilt the user's profile - still not working
3. Tried removing various Office registry keys as suggested on some web sites. - no change
4. Reinstalled office 2007 completely - no change.
5. Started using brain, downloaded Process Monitor from the old sysinternals site.
http://technet.microsoft.com/en-us/sysinternals/bb896653.aspx
I started the capture, tried to open word, then stopped the capture. I then set the Filter to show Process Name - winword.exe and then went down the list. And then noticed about a hundred errors related to opening this one registry key.
HKEY_LOCAL_MACHINE\SOFTWARE\Microsoft\Windows\CurrentVersion\Installer\UserData\S-1-5-21-632034446-1996701954-922709458-10172\Components
(Note: On your computer, the SID will be different). It had some weird file in it with rgb in the name so I backed up the key and then ripped out the SID entry completely. And then Voila, I was once again able to open office applications as that user.
Thursday, February 19, 2009
Solved: ISA 2006 WSS 3.0 extranet password prompt for office docs
So I finally got around to publishing our Windows Sharepoint Services 3.0 server through the ISA box. I set it up with Kerberos Delegation as to avoid any authentication issues and of course Forms Based Authentication. First thing I found out was that you do not want anything on the initial landing page that takes time to load such as a world clock/weather web part that has 4 countries in it. Let's just say ISA tacked on an extra 30 seconds to the load time of the page. Anyway, the next thing was getting All the Link translation mappings right like redirecting http to https for internally hardcoded links, netbios to dns, etc. (And all this on top of setting up Alternate Access Mappings (AAM) on the sharepoint server.
Then I noticed that Extranet users were getting prompted for authentication when they tried to open Office docs (.doc/.xls/.ppt). After much digging, I found the resolution on a message board.
http://www.tech-archive.net/Archive/ISA/microsoft.public.isa.publishing/2007-11/msg00005.html
"turn on persistent cookies (Web Listener | Forms | Advanced Form
Options)"
Entertainingly enough, when I went into the help for that setting it specifically lists that this setting is exactly for this Sharepoint problem! ARGH.
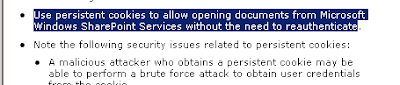
So I enabled mine for the 'only on private computers' and voila, the darn things works fine now.
*Caveat: They do warn you when you turn this on that it does create a cookie on the client machine that may contain sensitive data. Personally, if you fall into the following two scenarios I don't think that's a problem.
1.) You encrypt your laptop users' machines.
2.) You can't stand users whining about extra prompts.
Make sure that you pay attention to how long the Private and Public session timeouts since you're now using a persistent cookie.
Note: Some vista boxes may need a patch:
http://support.microsoft.com/kb/943280
Thursday, January 22, 2009
The Syntax for set-outlookanywhere decrypted
Exchange 2007, SP1 (not rtm)
Okay, I know I can be a bit slow on the uptake for some of these powershell commands but this one took way too long to get right. All the nice friendly examples from msdn leave out the Identity parameter. Powershell will be more than happy to barf an error back to you if you leave it out.
http://technet.microsoft.com/en-us/library/bb124149.aspx
Just what is this identity thing anyway? It's pretty much your CAS_Servername\rpc (Default Web Site)

So next you're asking why am I bothering since we've got a nice GUI, etc for setting up outlook anywhere and the permissions on the IIS folder /rpc. Well, through the careful string of failures at getting NTLM to work transparently through my ISA server (whilst still requiring rpc validation at the isa server itself), I determined that Basic authentication was good enough for me. But I still use NTLM for the web publishing rule from the ISA server to the exchange CAS server. With the advent of SP1 for exchange 2007, you can easily setup your server to use different combinations of Basic and NTLM for the Outlook Anywhere and RPC folders respectively. When your server generates AutoDiscover.xml it provides the client with the authentication level that is specified in the -ClientAuthentication Method. But if you want your ISA server to communicate with the exchange CAS with NTLM, then you have to set the -IISAuthentication parameter. (yeah, headaches abound). To see what your CAS server is using, run Get-OutlookAnywhere from powershell
ClientAuthenticationMethod : Basic
IISAuthenticationMethods : {Ntlm}
In summary:
1. My remote users have outlook 2007 sp1 and get autoconfigured to use Basic Auth.
2. My ISA server publishing rule uses NTLM for Authentication Delegation.
3. My rpc folder in IIS just has Integrated Auth checked.
For more information including how to setup an Exch 2007/ISA 2007/Outlook Anywhere/etc check out the following links:
Great tutorial by Thomas Shinder - covers everything from the setup of the exchange server, through the publishing in ISA all the way to the outlook client config:
http://www.isaserver.org/tutorials/Publishing-Exchange-2007-OWA-Exchange-ActiveSync-RPCHTTP-using-2006-ISA-Firewall-Part1.html
The ever reliable petri database:
http://www.petri.co.il/outlook_anywhere_2007_w_isa_server.htm
More info on the set-outlookanywhere syntax:
http://www.exchange-genie.com/2008/02/configuring-outlook-anywhere-for-exchange-2007-sp1/
Paper on setting up transparent authentication/NTLM with isa 2006 and exchange 2007. I did eventually get it to work in a test environment.
http://blog.msfirewall.org.uk/2008/07/publishing-exchange-2007-services-with.html
Tuesday, January 20, 2009
ISA 2006 Remote Desktop problem
So up until recently I was able to remote desktop into my ISA 2006 server from my management desktop. I verified that my management computers were still defined properly and I confirmed that the packets were being received on port 3389 at the firewall side. I decided to remove the recently applied KB956570 (08-037) and voila my remote desktop started working again! The patch was supposed to randomize NAT connections, etc but apparently it likes to kill RDP. Upon further research, I've also seen reference to it causing havoc for PPTP/VPN setups as well. As I have not found a real fix for it, I'd recommend you just uninstall it from Add/Remove programs (make sure the checkbox is marked for Show Updates).
Tuesday, January 13, 2009
Dell Latitude E6400 sound problem fixed - and dvd burning one as well.
*Updated - 4/17/09* New drivers from Intel as provided by Anonymous
http://downloadcenter.intel.com/Product_Filter.aspx?ProductID=2101
*Update* I tried out the DPC latency tool recommended by Martin. Here's a screen cap of how much the latency drops if you just physically remove the CD/DVD drive.
(the additional spike afterward was just me opening SnagIt). It's obscene.
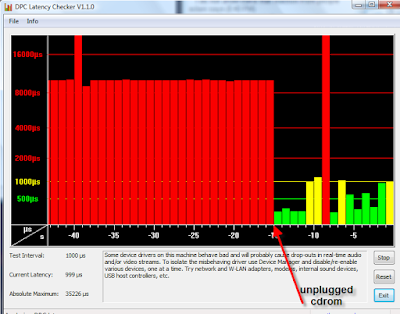
Update 2: Please see Martin's post in the comments section below for additional remediation steps.
Update 3: The Dell tech recommended switching the SATA mode in BIOS from IRRT to AHCI. Of course, if you do that you've got to completely reload your Operating system. I tried it on a spare drive with a fresh install of Vista 32 bit and I haven't had the audio skip yet though I'm still loading more apps on it to test with. The latency was still high but didn't appear to affect audio playback which seemed odd.
Update 4: I Disabled the eSATA port under BIOS and the latency issue with the DVD drive plugged in went away. (For a whole reboot) This just keeps getting better.
Original post:
So I noticed that the E6400 was having weird audio glitches with Vista while under light loads. It was behaving like the hard drive was under heavy load and interrupting the data transfer. But all the resource monitors only showed minimal load. I ran into this problem with all mp3 files and I tried just about everything on the help forums including a fresh load of XP and Vista respectively on a different hard drive. I tried turning off sound effects, changing power saving, turning off wireless, etc.
The solution: The latest Intel Matrix Storage Manager driver! While trying to fix a problem with DVD burning, I ran into a suggestion on the forums related to the SATA controller. After installing the latest driver I went ahead and tested the audio again and the darn thing works perfectly now. My guess is that the previous sata driver wasn't stable enough and was causing the audio problem as a side effect.
http://support.dell.com/support/downloads/download.aspx?c=us&l=en&s=gen&releaseid=R207267&SystemID=LAT_E6400&servicetag=&os=WLH&osl=en&deviceid=11530&devlib=0&typecnt=0&vercnt=2&catid=-1&impid=-1&formatcnt=1&libid=41&fileid=290228
Release Date: 1/8/2009
Version: 8.7.0.1007 Other Versions
Download Type: Application
File Format: Hard-Drive
File Size: 21 MB
Granted, if I push it hard enough I can still make it skip once in a while but it takes a lot of effort. Whereas previously I could do it with freecell.
Subscribe to:
Posts (Atom)


