Tuesday, November 24, 2009

Search Server 2008, ISA 2006, AAM, and why All Sites wasn't showing up externally

So I've had my WSS 3.0 SP2 site running for quite some time now and had all the publishing in place for ISA Server 2006 so my guys could get access to it remotely. I finally decided to try out Search Server 2008 Express which took a few tries to get installed correctly. (Thank heaven for virtual machines and snapshot rollback!). So now all my sites have an extra drop down under Search for "All Sites" and I now have a search center site collection for users to hit directly as well. Problem is, that it wasn't showing up externally and the search center site completely barfed for my external users.

At this point I was pretty sure AAM (Alternate Access Mapping) was involved but I just wasn't sure why Search was so special. It took a couple of hours but I figured it out. There's a ton of good websites out there that show you how to set up sharepoint and ISA server so I'm just going to focus on what I missed and skip the basics.

Mistakes:
1. I had never 'Extended' the Web Application. I only had a Default Zone Web Application.
2. My ISA publishing rule was using the Intranet Zone name for the server. Which means that all external users were being seen by the Sharepoint server as using the Intranet Zone even thought they were using the Internet address. (i.e. They typed in sharepoint.yourdomain.com and the ISA server sent on sharepoint.intranet.yourdomain.com). This was never a problem before search but it became one afterwards.


Warning: I am by no means an expert on Sharepoint, I just play one at work. The following comprises the most critical things I had to change to get mine to work. Always back up your systems before making changes to production environments.

So to fix it, I first went into Central Administration, Application Management and then "Create or Extend Web Application"


Then "Extend an Existing Web Application"


Then click the drop down for Web Application and make sure the right website is selected. Then fill in the port (in almost all cases its 80) and the Host Header (REQUIRED - since we'll be stacking onto the same Port as other Sites on the same server). I use Kerberos but if you haven't set up your SPNs then choose something else. Make sure to choose the Intranet zone (or whatever yours corresponds to)

Now either Restart IIS manually, or iisreset /noforce, or if you're bored reboot the whole server.
When it comes back you should be done. Test it from an external location.

For reference, here's my AAM settings (modified of course.) And I wouldn't worry if yours don't match exactly, sharepoint is just weird that way.


Note: If you had anything published on the original Default site, you'll need to duplicate it into the new Host Header site. i.e. /images or other static content, etc using the IIS Manager. It is, for all intents and purposes, a completely different site.

Useful References:
Microsoft reference - at the bottom talks about Extending Web Applications
http://technet.microsoft.com/en-us/library/cc268368.aspx

Tutorial on publishing sharepoint through ISA
http://www.isaserver.org/tutorials/How-to-Publish-Microsoft-Sharepoint-Service-ISA-Server-2006.html

AAM
http://technet.microsoft.com/en-us/library/cc288609.aspx

More on extending
http://sharepointnotes.wordpress.com/2008/03/02/sharepoint-extranet-solutions-with-isa-server-2006-part-2-creating-the-extranet-web-application/

And more AAM
http://blogs.catapultsystems.com/matthew/archive/2008/05/19/search-results-and-aam.aspx

Wednesday, November 11, 2009

Why you can't find Hash Publication for BranchCache or Lanman Server under administrative templates.

If, like me, you forgot to update your Central Policy store when you upgraded your AD to 2008 R2, then these won't show up at all.

First confirm that you are using a Central Policy store by opening up any group policy in Group Policy Management and look for the highlighted text.


Once confirmed, now go to \\FQDN\SYSVOL\FQDN\policies\PolicyDefinitions (replace FQDN) and look at the dates. Now compare those with c:\windows\PolicyDefinitions on one of your 2008 R2 AD controllers. If the 2008 R2 has newer files, copy all the contents of that PolicyDefinitions folder to the \\FQDN\SYSVOL\FQDN\policies\PolicyDefinitions, replacing all that's there currently.

Now if you close Group Policy Management, reopen it, and then go back into a policy you'll see new entries including the elusive "Lanman Server" which contains the "Hash Publication for BranchCache" value that you're looking for.

Sunday, November 8, 2009

The dreaded e00081d9 The Backup Exec job engine system service is not responding error

It's odd that every time I get backup exec 12.5 SP2 to a nice stable point something inevitably goes wrong. I suddenly started getting this error when the other half of my two backup jobs would run. I tried deleting/re-creating the jobs from policy, liveupdate, beutility- rebuild/repair/etc the db. Each time the backup job engine would puke and fail. Finally I gave up, made a copy of all the mdf and ldf files in the backup exec/data folder and uninstalled the program. And wiped out the whole backup exec folder for good measure. Then I re-installed it, liveupdated it, and then stopped the backup exec and sql services so I could re-swap out the mdf/ldf files. This restored all my jobs/policies/preferences/etc so I wouldn't have to start from scratch. But I still ran into the problem so I ran a manual backup job and it worked so I went ahead and deleted the whole Policy and selection list and made a new one from scratch.

After sleeping on it, it occurred to me that I had made one other change to one of the servers that gets backed up. This other server had died this week and since I only cared about the static files on it I had done a full rebuild of the server including upgrading the OS from 2k3 to 2k8 server. I kept the same name, folder names, etc and installed the beremote agent on it. In retrospect, I think after doing that I should have wiped out the .idr file that automatically gets generated at C:\Program Files\Symantec\Backup Exec\idr\Data. The more I think about it, the more likely it is that by changing the whole OS/setup of a previously snapped IDR box, I had confused the job engine to the point of failure. Of course, for now it's only a theory.

Thursday, November 5, 2009

SQL 2008 Transactional Replication and initializing from a backup file

Now there's a fun process to go through, especially if like me you don't know jack about T-SQL. Let's face it, I currently know more words in Mandarin than I know commands in T-SQL; which isn't a lot. Having already done several tests with the automatic method of setting up Transactional Replication (where it does all the initial synch work for you and you just sit back and watch) I had assumed that Initializing from a backup would be a breeze. Famous last words.

There are some articles out there on the web but I found that most of them either assumed you knew more or just left out minor details. If, like me you're trying to set up replication of a huge database over a bandwidth limited connection or if you have some other reason that the initial setup has to be done from a backup file, then here's the walkthrough. By the way, I've only done the one-way Transactional Replication as in my situation this is just a failover site and will not need to send changes back to the original server.

Steps (order is very important)

  1. Set up the Distributer – database and share – one time setup
  2. Set up Publisher on source server - Don’t use either checkbox for snapshot.
  3. Enable the flag under the Publication properties to allow “initialize from backup”. (Right-click on the publication, properties)
  4. Disable the distribution cleanup agents. (Under SQL agent jobs)
  5. Make a Full backup of the database. Keep a local copy as you'll need it later.
  6. Copy database to other site. (Over the network, courier pigeon, magic, whatever)
  7. Restore database with the same name
  8. Create pull subscription on the destination server. (see scripts provided below)
  9. Check status – Replication monitor -> drill down to publisher (add if needed), “View details on the subscription on the right to get a status report (3rd tab in window that pops up)
  10. After it’s done synching up, turn off the “initialize from backup” flag or else the cache it keeps will never shrink. And re-enable the distribution cleanup agents.
  11. TEST IT. Check the tables after synchronization and then check again after new transactions have been sent. (Wait a few minutes after each replication interval to give it time to catch up).
The reason that order is so important is that after you configure the publisher to enable the "Initialize from backup" and stop the cleanup jobs, it starts keeping a full record of all transactions that have occured since then. (Yes, the DB could grow a lot depending on how long this takes). The backup has a special value in it called an LSN number. This value tells the server to only send transactions that occurred after the backup was made.
Reference:
http://www.replicationanswers.com/NoSyncOn2005.asp

TIP 1: If you try to use a backup that was created before the publication was set up, it will fail.
TIP 2: If you get the Msg 21397 error mentioned in the link above, then you probably forgot to stop the Distribution cleanup agents and the server has thrown out some of the transactions that have occurred since the LSN (backup).

Step 10 is necessary because the distributor will keep waiting around for another subscriber and in the meanwhile your ms_replcommands table will continue to grow.
http://ilkirk.com/archive/2009/01/a-replication-fun-fact/

Now we'll move on to the actual subscription scripts that you will run around step 8. (I'll assume that you set up the Publication through the GUI keeping in mind not to create a snapshot). If you don't know how to create the publication, see the help file or http://msdn.microsoft.com/en-us/library/ms151160.aspx

On the Publishing server we're going to use sp_addsubscription to define the initial subscription, then we'll run sp_addpullsubscription and sp_addpullsubscription_agent on the Subscriber machine. I created the subscriber scripts by using the GUI and choosing the export to script option at the end instead of executing the change. Then I modified the subscriber scripts and that's how I recommend that you set them up. My generalized scripts below should just be used as a guide.

Script 1: (Yes, the exec line is really long. Run on publisher)

-----BEGIN: Script to be run at Publisher 'Publishing_SQLServerName'------------
------- backupdevicename has to be located on the Publisher machine -------

use [Your_DB_Name]
exec sp_addsubscription @publication = N'Your_DB_Name_PUB', @subscriber = N'Subscribing_SQLServerName', @destination_db = N'Your_DB_Name', @sync_type = N'initialize with backup', @backupdevicetype = 'disk', @backupdevicename = 'e:\BACKUP\Your_DB_Name090209.bak', @subscription_type = N'pull', @update_mode = N'read only'
GO
-------END: Script to be run at Publisher 'Publishing_SQLServerName'-------------

Replace Your_DB_Name, Your_DB_Name_PUB, Subscribing_SQLServerName, and the location of the backup with appropriate values.

Script 2: (run at the subscriber sql server)

-----BEGIN: Script to be run at Subscriber 'Subscribing_SQLServerName'-----------------
use [Your_DB_Name]
exec sp_addpullsubscription @publisher = N'Publishing_SQLServerName', @publication = N'Your_DB_Name_PUB', @publisher_db = N'Your_DB_Name', @independent_agent = N'True', @subscription_type = N'pull', @description = N'', @update_mode = N'read only', @immediate_sync = 0
-----END: Script to be run at Subscriber 'Subscribing_SQLServerName'-----------------

Same drill as before with changing out the placeholders with actual names.

Script 3: (still on the subscriber). Now we're going to set up the agents which will handle the data pulls for us. (once again, a really long exec command)

-----BEGIN: Script to be run at Subscriber 'Subscribing_SQLServerName'-----------------
exec sp_addpullsubscription_agent @publisher = N'Publishing_SQLServerName', @publisher_db = N'Your_DB_Name', @publication = N'Your_DB_Name_PUB', @distributor = N'Publishing_SQLServerName', @distributor_security_mode = 0, @distributor_login = N'dist_login_acct', @distributor_password = N'dist_password', @enabled_for_syncmgr = N'False', @frequency_type = 64, @frequency_interval = 0, @frequency_relative_interval = 0, @frequency_recurrence_factor = 0, @frequency_subday = 0, @frequency_subday_interval = 0, @active_start_time_of_day = 0, @active_end_time_of_day = 235959, @active_start_date = 20090902, @active_end_date = 99991231, @alt_snapshot_folder = N'', @working_directory = N'', @use_ftp = N'False', @job_login = N'domain\username', @job_password =N'user_password', @publication_type = 0
GO
-----END: Script to be run at Subscriber 'Subscribing_SQLServerName'-----------------

If you went through the GUI you will have seen where it prompted you for user accounts. The windows account is needed to access the Distribution share on the publisher that houses the snapshots(if we were using them) and updates. Fortunately both machines were on the same domain so that was easy for me. For the distributor I created a SQL login on both servers with the same username/password and granted that user rights on the publishing server. This account is used by the agents on the subscriber to check the distribution database on the publisher.
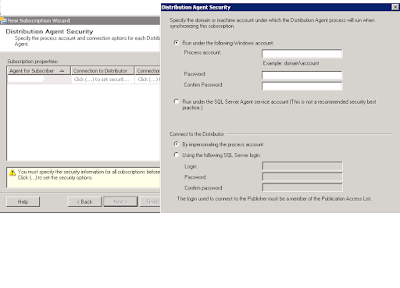
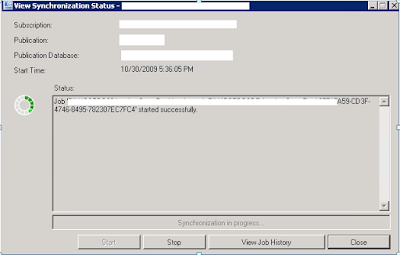
Provided you didn't get any errors when you ran those scripts, you'll want to start monitoring the replication now. Right click on the Subscription and View Synchronization Status.

Now right-click in SQL Management Studio on Replication and Launch the Replication Monitor. Drill down to the publisher (add if it need be) and then drill down to the publication. Right click on the right panel and View Details. The window that pops up is really useful to see how replication is going.
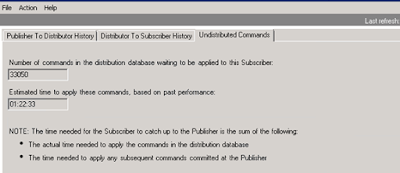
What's great about that window is that you can watch the # of pending transactions that are waiting to be synch'd. Initially this will be a very big number until it catches up. At this point the only thing left are steps 10 and 11. Turn off the flag on the publisher for Initializing from backup and actually go into the database and replica to see if data is being transferred properly. (taking into account replication intervals, etc)

TIP 3: If you get this error: The distribution agent failed to create temporary files in C:\Program Files\Microsoft SQL Server\100\COM directory. System returned errorcode 5.
Then you need to grant the user that the Distribution Agent is running as Write access to that directory. http://support.microsoft.com/default.aspx/kb/956032

TIP 4: You may start getting errors in your DB related to "Length of LOB data". This occurs because by default it only supports chunks up to 65535. Go into SQL management Studio, right click on the server and choose properties. Set the Max Text Replication Size to something higher. Or do what I did and use the max value of 2147483647.

TIP 5: I found a good reference book that just focuses on SQL replication called "Pro SQL Server 2008 Replication" (ISBN13: 9781430218074). It explains in detail the mechanisms behind replication and covers all types of replication for SQL and how to choose the one that's right for you.

Tuesday, September 29, 2009

Getting started with MDT 2010 and windows 7

Microsoft recently released an updated version of their Deployment Toolkit - version 2010. As with all Microsoft products, the first few versions start out 'okay' and then by the 3rd or 4th version become a feature rich juggernaut. And we're only going to just scratch the surface today on this product.

Let's start by downloading the Toolkit: (Preferably one that matches your processor type)
http://www.microsoft.com/downloads/details.aspx?familyid=3bd8561f-77ac-4400-a0c1-fe871c461a89&displaylang=en

Other things to have ready:
Windows 7 Enterprise DVD or ISO (Ultimate will probably work but I haven't tried it).
A simple application DVD/ISO/folder for something like Office or acrobat reader.
A blank CD or a usb flash drive.

Once you have it downloaded, install it and then open the Deployment Workbench. From there go under Information Center, then Components.

This view will show you what components are already installed on your machine and gives you the option to download and install the rest. For now we need MSXML 6.0 and the WAIK installed. If you don't have them, click on each one and then click on Download (or Queue). The WAIK is over a GB so it may take a while! I know this gloss-over won't do this toolkit justice but feel free to look over the other optional downloads later on. Once you get to the point where both of those show up under 'Installed' then proceed.

If you take a peek under the "Getting Started" tab they've got a diagram which will either enlighten you or give you a migraine depending on your level of familiarity with using Microsoft Deployment tools.

Skip down to the Deployment Shares icon, right click it and choose to create a new Deployment Share. This deployment share is going to be the heart of the whole project. All applications, drivers, OS images, etc will go into subfolders of this folder and all your remote clients will be connecting to it to install from. For now just leave all the default names. Make sure the drive you place this on has at least 10GB for this example project. Now your console should look like this:


Now right click on Operating Systems and then "Import Operating System". Select "Full set of source files" and then point it to your Windows7 source files location. (DVD, a mounted ISO, folder, etc). Leave the name as is for default and just continue through.

Now right click on Applications and choose "New Application". The first radio button will copy over the whole source. The second will just take a UNC share name and that's what the client will connect to directly. Choose whichever you want for now and hit Next. Provide an application name like Office 2007 or something, then a source folder, and finally a command line. (If you are publishing an office program, try using the customization setup to get nice, silent installs).

Now we need to create a Task Sequence. Give it an ID like 1 or Test1, etc and a name. On the next screen choose "Standard Client Task Sequence". Choose an OS. Product Key is optional at this point. Organization name on the next screen. Default admin password, next. Finish it up.
These tasks are what you'll be prompted with later when you boot off the media that we're going to make.

You can also choose to add in Drivers to be injected at build time. It appears to be pretty much automatic once you add them.

Now right click on your MDT Deployment Share and choose (Update Deployment Share). This will generate new ISO's, etc. You should do this after any major change to make sure it's up to date. Now open Windows Explorer and go to your deployment share folder. Under it you will find a Boot folder which contains ISO's and WIM's for x86 and .64. I'm doing all x64 personally so I'm only using the LiteTouchPE_x64.iso. Burn this ISO to a CD or you can mount it and transfer it to a USB stick.

Quick note on how to do the USB stick method:
run diskpart from a command prompt.
run list disk to find out which one is your usb drive
select disk 1 (or whatever yours is)
clean
create partition primary
select partition 1
active
format fs=fat32
assign
exit
Then copy the contents of the mounted litetouch ISO file to the root of the USB drive.

xcopy :\*.* :\*.* /s /e /f


Now boot a computer off your shiny new image and eventually you'll see the Microsoft Solution Accelerator screen: (in case you're wondering, I'm using Hyper-V which makes capturing these images easier and testing much faster.)


Choose the first option and on the next screen provide a user/pass/domain so that the installation can connect to network shares, etc. Choose the Task we created on the next screen that pops up. Then by default it generates a random computer name, you can rename this as needed. Then you can tell it to auto-join the domain when it's done by providing the missing information in each of the fields. Skip past the USMT screen, choose a language, choose a time zone, check off the application(s) to install (You should see your application listed here).

On this next screen you can choose to have it automatically capture a reference image at the end for you. This is useful if you have a WDS server or if you want to import the completed image back into the MDT server later as a new base OS image. If you choose this option it'll automatically run Sysprep, reboot, and upload for you. For now you can just choose not to do it.

The next screen let's you set up BitLocker! Pretty snazzy.
And then the final screen has a "Begin" button.

Now it'll install the OS for you, then the application(s), and if you went with the capture, then sysprep and capture.


The install will reboot itself as needed, etc. At this point this tutorial is done. If you're feeling confident, I recommend playing around with manually editing Task Sequences to get a feel for just how customizable this system is. You can insert applications, insert reboots, schedule windows updates before and after application installs.

Tuesday, September 22, 2009

Symantec Endpoint Protection 11.0.5 released - finally some windows 7 support

Now the last hurdle has been removed for the start of my Windows 7 deployments; lack of a working anti-virus. Endpoint 11.0.5 was released to gold/premium customers yesterday as see on the forums and today I found it on my multi-tier page at Fileconnect. So those of you with active maintenance/support contracts with Symantec should be able to download it now.


Supposedly this new version also has some nice improvements for group updates. Windows 2008 R2 is now fully supported. Release notes here:

http://service1.symantec.com/SUPPORT/ent-security.nsf/docid/2009072315130848

Wednesday, September 9, 2009

powershell script to kill process by name that's been running for more than x minutes

If you ever have some badly written program that you have to use that leaves orphaned processes running in memory and you need to end them - but only the older ones then use this script. You only have change the name of the process and the number of minutes that it has to have been running for. (Note: It's a negative number from the current time).

##############################################
#
# Powershell script to kill off orphaned processes
# Free for any Use
#
# Script is not 'signed' so you either have to digitally sign it
# or run 'Set-ExecutionPolicy remotesigned' or 'Set-ExecutionPolicy
# Unrestricted' from Powershell at least once prior to using this script.
#
# Batch File syntax: powershell "& 'c:\foldername\killorphanproc.ps1'"
#
# To figure out the process name you can go into powershell and just
# run get-process by itself for a listing
#
# Script is provided 'As-Is' with no support.
#
##############################################


#Get list of processes matching the name and older than x minutes.
$orphanProcs = get-process | where {($_.Name -eq "winword") -and '
($_.StartTime -lt (get-date).addminutes(-30))}

#Check if list is Null and if not kill them all:
If ($orphanProcs) {
#display list
$orphanProcs
#kill list
$orphanProcs | foreach { $_.Kill() }
} Else {
echo "no processes found older than specified"
}

Thursday, August 20, 2009

Windows 7 x64 and my old HP Laserjet 1100

It's always depressing when you install the latest OS only to find that your old reliable peripheral just isn't listed anymore. I scanned down the HP list twice and even tried the HP website (which doesn't even have a Vista one since it was on the DVD). I couldn't even get it to accept the driver off the Vista x64 install DVD.

And then a ray of hope, I found a link to the Microsoft hardware update catalog. I did a search for my laserjet 1100 and it returned results that were listed for Windows 7.

http://catalog.update.microsoft.com/v7/site/Search.aspx?q=%22windows%207%20laserjet%201100

You just add the drivers you need to your basket (it's kinda like shopping but the drivers are free) and then you just view the basket and download your drivers.


One hitch, the filename was so long that winzip wasn't happy. So I just renamed the .cab file to something shorter and then I was able to extract the files. Then I just browsed to it with the "Have Disk..." option and voila. My printer works now.